Hyper-V integration services, are a bundled set of software which, when installed in the virtual machine improves integration between the host server and the virtual machine. Integration services (often called integration components), are services that allow the virtual machine to communicate with the Hyper-V host. Hyper-V Integration Services is a suite of utilities in Microsoft Hyper-V, designed to enhance the performance of a virtual machine’s guest operating system.
In short and general, the integration services are a set of drivers so that the virtual machine can make use of the synthetic devices provisioned to the VM by Hyper-V.
Hyper-V Integration Services optimizes the drivers of the virtual environments to provide end users with the best possible user experience. The suite improves virtual machine management by replacing generic operating system driver files for the mouse, keyboard, video, network and SCSI controller components. It also synchronizes time between the guests and host operating systems and can provide file interoperability and a heartbeat.
The Hyper-V Integration Services are sometimes called “enlightenments”. This fancy word refers to the concept of making the virtual machine aware of its environment. An “unenlightened” virtual machine doesn’t “know” that it’s virtualized. When the “enlightenments” are installed, it becomes “aware” of virtualization. To really understand what this means, you need to first understand difference between Emulated & Synthetic devices.
Difference between Synthetic and Emulated devices
Emulated Hardware
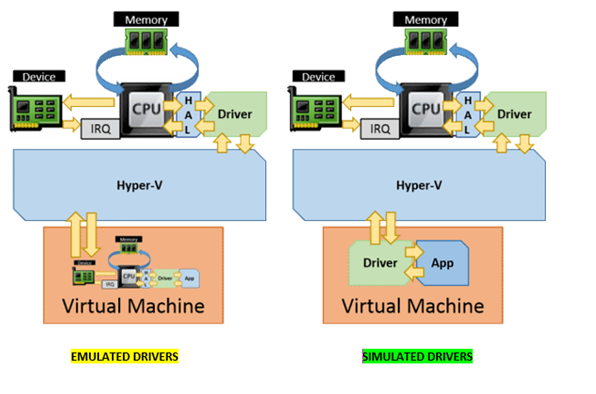
Emulated hardware is a software construct that the hypervisor presents to the virtual machine as though it were actual hardware. This software component implements a unified least-common-denominator set of instructions that are universal to all devices of that type. This all but guarantees that it will be usable by almost any operating system, even those that Hyper-V Server does not directly support. These devices can be seen even in minimalist pre-boot execution environments, which is why you can use a legacy network adapter for PXE functions and can boot from a disk on an IDE controller.
The drawback is that it can be computationally expensive and therefore slow to operate. The software component is a complete representation of a hardware device, which includes the need for IRQ and memory I/O operations. Within the virtual machine, all the translation you see in the above images occurs. Once the virtual CPU has converted the VM’s communication into that meant for the device, it is passed over to the construct that Hyper-V has. Hyper-V must then perform the exact same functions to interact with the real hardware. All of this happens in reverse as the device sends data back to the drivers and applications within the virtual machine.
The common emulated devices you’ll work with in Hyper-V are:
- IDE hard drive controllers
- Emulated (legacy) network adapters
- Video adapters
Some of the emulated devices modle are Intel 440bx motherboard and an Intel 21140 network adapter. These devices are handled through emulation that runs in the management operating system (parent partition).
Synthetic Hardware
Synthetic hardware is different from emulated hardware in that Hyper-V does not create a software construct to cover-up as a physical device. Instead, it uses a similar technique to the Windows HAL and presents an interface that functions more closely to the driver model. The guest still needs to send instructions through its virtual CPU, but it is able to use the driver model to pass these communications directly up into Hyper-V through the VMBus. The VMBus driver, and the drivers that are dependent on it, must be loaded in order for the guest to be able to use the synthetic hardware at all. This is why synthetic and SCSI devices cannot be used prior to Windows startup.
Generally speaking you will never see reference to a “synthetic” or “emulated” device in the user interface as that has been hidden as much as possible.
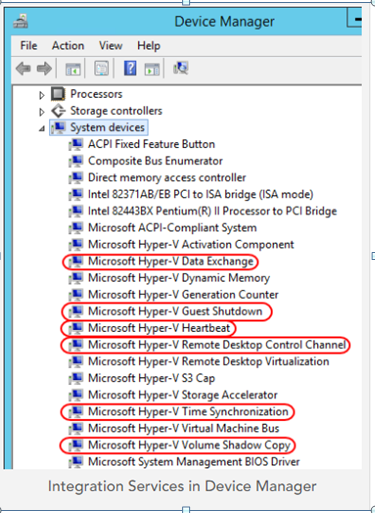
By looking in Microsoft Device Manager, you can always tell whether you are using the more efficient synthetic drivers in your Hyper-V virtual machines. Open Device Manager, If the OS is using the higher performance Synthetic devices you’ll see the “VMBus” in its name or in latest versions “Microsoft Hyper-V “ in its name For example , “Hyper-V Network Adapter” under Network Adapters whereas if it is emulated you will find “Intel 21140 network adapter” Under Network Adapters or another.
Emulated devices emulate an existing hardware device that exists as physical hardware. The advantage of emulated devices is that most operating systems usually have in-box drivers for them. Emulated devices might experience performance issues because of the overhead of emulation. Additionally, because the emulated devices may not have been designed specifically for virtualization purposes, they could also experience performance issues.
Synthetic devices are high performance software components that control access to physical hardware devices that are designed for optimal performance in virtualized environments
Note: The new generation 2 virtual machines will not be able to use legacy hardware at all. However, they will use UEFI mode (unified extensible firmware interface) instead of the traditional BIOS mode, so all hardware will be usable right from startup.
Enlightenments are presented via drivers in the guest. The Hyper-V Integration Services take this concept a step further to provide a number of additional features. Whereas basic enlightments are standard driver packs, the Integration Services require a little something more. These are delivered in the form of services for Windows guests and daemons for Linux guests.
As with basic enlightenments, the Integration Services interact with the hypervisor and management operating system through drivers:
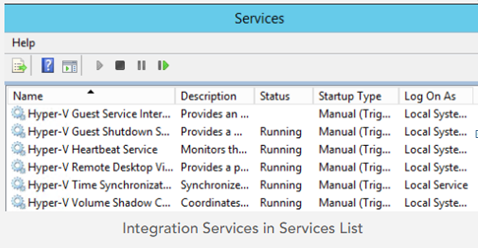
In a physical system, the purpose of a driver is to move instructions and data between the operating system and hardware. In a virtual system, the “hardware” is the hypervisor. Therefore, it’s only natural that drivers be exploited to serve as a communication gateway. However, the driver model itself isn’t quite enough to carry out a number of activities. A service is better suited for such functionality. These appear in Windows alongside all the other services:
How to properly enable or disable one or more Integration Services for a Hyper-V VM
It is possible to disable these integration services via Device Manager or from the Services list. Tinkering in either of these locations is not recommended, and potentially not supported.
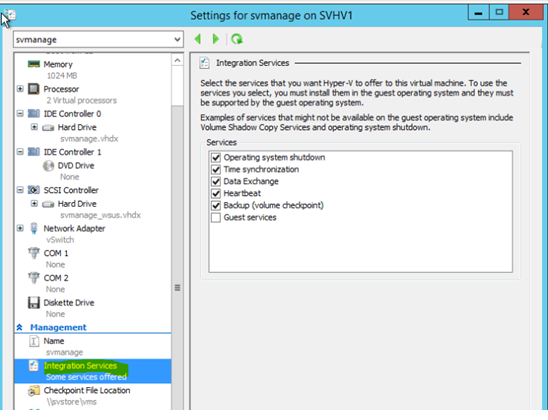
It is always recommend to enable/disable the integration services from VM settings . Clear the check box as shown in below figure if you are planning to disable and vice versa.
Note: Post releases of Windows Vista and Windows Server 2008 are Integration Services-aware, but for other operating systems, the guest iso file is located in the C:\windows\system32\ path of the Hyper-V server. Hyper-V Integration Services are similar to the VMware Tools package used to improve the interaction of guest operating systems within the VMware virtualization infrastructure.
Available Integration Services
After the integration services software package has been installed in the virtual machine, the following integration services can be presented to the virtual machine.

By default, all of Integration services are enabled except Guest services.
Many of these services are conveniences, such as guest file copy, while others are important to the virtual machine’s ability to function correctly, such as time synchronization.
Operating system shutdown
The operating system shutdown service provides a mechanism to shut down the operating system of a virtual machine from the management interfaces on the host or management computer. This allows the Hyper-V administrator the ability to initiate an orderly shutdown of the virtual machines without having to log into the virtual machine. The virtual machine will attempt to close open processes and write to disk any data in memory before shutting down the virtual machine, in the same way if the administrator had selected Shutdown from within the virtual machine.
Time synchronization
The time synchronization service provides the ability to synchronize your virtual machines’ time with the time from the host. Just as time is critical to physical servers it is critical to virtual machines.
Data Exchange
The data exchange service, also known as key-value pairs (KVP), allows for the sharing of information between the host and virtual machine. General information about the virtual machine and host is automatically generated and stored in the registry for virtual machines running Windows and in files for virtual machines running Linux. Additionally there is a registry key and file where information can be created manually that can be shared between the host and the virtual machine. For example a service running in a virtual machine could write to this location when a specific event has occurred that requires the Hyper-V administrator to perform a specific action. Access to the data from the host is via WMI scripts only.
Heartbeat
The heartbeat service monitors the state of running virtual machines by reporting a heartbeat at regular intervals. This service helps you identify running virtual machines that might have stopped responding. You can check the heartbeat status of a virtual machine on the Summary tab of the Virtual Machines details page.
Backup (volume snapshot)
The backup service enables consistent backup of the virtual machines from backup software running on the host. The backup service allows for the virtual machine to be backed up while it is running without any interruption to the virtual machine or the services running in the virtual machine.
Guest services
The guest service allows the Hyper-V administrator to copy files to a running virtual machine without using a network connection. Beforehand the only way to copy files to the virtual machine was for both the virtual machine and the host be connected to same network and then either use file services to copy file or to create a remote desktop session to the virtual machine and copy files via RDS session. To copy a file to a virtual machine you need to use the Copy-VMFile PowerShell cmdlet.
How to Install Integration Services in Hyper-V
https://www.altaro.com/hyper-v/hyper-v-installing-integration-services/
Updating/Upgradinng Integration Services
While the basic architecture has remained relatively unchanged since Windows Server 2008 Hyper-V, the integration components have continuously been updated by Microsoft:
- Each release of Hyper-V adds new features, and you need a current version of the integration components to use these features.
- Security and bug fixes update the integration components between major releases.
It is, therefore, important to keep the integration components up-to-date so:
- You have access to the latest Hyper-V features
- Your deployments get fixes for bugs
- Security vulnerabilities are patched
Why Upgrading Integration Service is required?
There were two ways that Microsoft supplied integration components before Windows Server 2016 (and therefore, Windows 10):
- The latest version of the integration components was built into that version of Windows at the time of release.
- A file on the host, called “VMGuest.ISO”, was updated by Windows Updates.
The process of deploying updated integration services into a Windows guest after general availability was tiresome. The basic method was to use Hyper-V Connect to attach to each virtual machine, log in, and run an integration services update from “VMguest.ISO”, which required a reboot. This manual task would require a maintenance window for each virtual machine. Because this was a manual task and introduced downtime, I suspect that many just decided to live without the updates, possibly falling out of support and becoming vulnerable to any otherwise-fixed security problems.
The second option was to use System Center Virtual Machine Manager (SCVMM). This process allowed you to update all of your machines at once (or in batches), with the obligatory reboot. At least you could automate this process using PowerShell, but I believe only a very small percentage of Hyper-V customers have meaningfully deployed (although sales figures will differ) SCVMM. And there are multiple to push VMGuest.iso with third part tools
How Updating has Changed
After years of feedback, starting with Windows 10, and then with subsequently released Windows Server 2016, Microsoft changed the update process. You won’t be able to find a VMGuest.ISO in WS2016, and that’s because it’s not used anymore. Instead, Microsoft is updating the Hyper-V integration components in the guest OS via Windows Update. For most customers, this is going to be pretty simple: just deploy Hyper-V and your virtual machines and there’s nothing more to do. But for a few, they’ll need to understand the system requirements.
The first requirement is that the guest OS in your virtual machines must have access to Windows Update in some way, such as direct access, WSUS or System Center Configuration Manager.
The second requirement is dependent on the guest OS that you are running on WS2016 (or Windows 10).
If you are running any of the below in the guest OS, then Windows Update will work without anything special being done:
- Windows Server 2016,2012 R2, 8.1 & 10
If you are running an older OS, such as below, then you need to make sure that the Data Exchange integration service is running:
- Windows Server 2012,2012 R2 SP1,7,8 & Vista SP2
For Windows XP/Windows Server 2003 till through Windows 8.1/Windows Server 2012 R2 while running on any Hyper-V host version from 2008 through 2012 R2, you would install/update by inserting the host’s vmguest.iso in the guest.
Any time that Microsoft released an update for the integration services via Windows Update, only the host would be automatically updated. The guests could only be updated via a manual process. You could use the action shown above, manually insert the vmguest.iso, or even manually transfer the install files into the guest.

Any time that Microsoft released an update for the integration services via Windows Update, only the host would be automatically updated. The guests could only be updated via a manual process. You could use the action shown above, manually insert the vmguest.iso, or even manually transfer the install files into the guest.
Now, the client packages for the integration services are also delivered via Windows Update. Simply keep your guests up-to-date and you will no longer need to worry about this.
In addition, if your virtual machines are isolated from Windows Update? There is a workaround for that, too. You can download the latest version of the integration components (as a .CAB file) from the https://support.microsoft.com/kb/3071740 to your guest OS. Then you can run a PowerShell cmdlet to install the update:
PowerShell: Add-WindowsPackage -Online –PackagePath <path to .CAB file>
Some operating systems have the integration services built-in, while others require that you install or upgrade this package as a separate procedure after you set up the operating system in the virtual machine.
| Guest operating system (server) | Integration Services | Notes |
| Windows Server 2016 | Built-in | Datacenter, Standard, and Essentials editions. |
| Windows Server 2012 R2 | Built-in | |
| Windows Server 2012 | Built-in | |
| Windows Server 2008 R2 with Service Pack 1 (SP 1) | Install the integration services after you set up the operating system in the virtual machine. | Datacenter, Enterprise, Standard and Web editions. |
| Windows Server 2008 with Service Pack 2 (SP 2) | Install the integration services after you set up the operating system in the virtual machine. | Datacenter, Enterprise, Standard and Web editions (32-bit and 64-bit). |
| Windows Home Server 2011 | Install the integration services after you set up the operating system in the virtual machine. | |
| Windows Small Business Server 2011 | Install the integration services after you set up the operating system in the virtual machine. | Essentials and Standard editions. |
| Windows Server 2003 R2 with Service Pack 2 (SP2) | Install the integration services after you set up the operating system in the virtual machine. | Standard, Web, Enterprise, and Datacenter editions (32-bit and 64-bit). |
| Windows Server 2003 SP2 | Install the integration services after you set up the operating system in the virtual machine. | Standard, Web, Enterprise, and Datacenter editions (32-bit and 64-;:bit). |
Ref: https://technet.microsoft.com/en-us/library/dn792027(v=ws.11).aspx
Hyper-V VM Integration Services: List of Build Numbers
Windows Server 2008
| Build Number | Knowledge Base Article ID | Comment |
| 6.0.6001.17101 | n/a | Windows Server 2008 RTM |
| 6.0.6001.18016 | KB950050 | Windows Server 2008 RTM + KB950050 |
| 6.0.6001.22258 | KB956710 | Windows Server 2008 RTM + KB956710 |
| 6.0.6001.22352 | KB959962 | Windows Server 2008 RTM + KB959962 |
| 6.0.6002.18005 | KB948465 | Windows Server 2008 Service Pack 2 |
| 6.0.6002.22233 | KB975925 | Windows Server 2008 RTM + KB975925 |

Windows Server 2008 R2
| Build Number | Knowledge Base Article ID | Comment |
| 6.1.7600.16385 | n/a | Windows Server 2008 R2 RTM |
| 6.1.7600.20542 | KB975354 | Windows Server 2008 R2 RTM + KB975354 |
| 6.1.7600.20683 | KB981836 | Windows Server 2008 R2 RTM + KB981836 |
| 6.1.7600.20778 | KB2223005 | Windows Server 2008 R2 RTM + KB2223005 |
| 6.1.7601.16562 | n/a | Windows Server 2008 R2 Service Pack 1 Beta |
| 6.1.7601.17105 | n/a | Windows Server 2008 R2 Service Pack 1 RC |
| 6.1.7601.17514 | KB976932 | Windows Server 2008 R2 Service Pack 1 RTM |
Windows Server 2012
| Build Number | Knowledge Base Article ID | Comment |
| 6.2.9200.16384 | n/a | Windows Server 2012 RTM |
| 6.2.9200.16433 | KB2770917 | Windows Server 2012 RTM + KB2770917 |
| 6.2.9200.20655 | KB2823956 | Windows Server 2012 RTM + KB2823956 |
| 6.2.9200.21885 | KB3161609 | June 2016 update rollup for Windows Server 2012 |
Windows Server 2012 R2
| Build Number | Knowledge Base Article ID | Comment |
| 6.3.9600.16384 | n/a | Windows Server 2012 R2 RTM |
| 6.3.9600.17415 | Windows Server 2012 R2 RTM + KB3000850 | |
| 6.3.9600.17831 | KB3063283 | Windows Server 2012 R2 RTM + KB3063283 |
| 6.3.9600.18080 | KB3063109 | Windows Server 2012 R2 RTM + KB3063109 |
| 6.3.9600.18339 | KB3161606 | June 2016 update rollup for Windows Server 2012 R2 |
| 6.3.9600.18398 | KB3172614 | July 2016 update rollup for Windows Server 2012 R2 |
| 6.3.9600.18692 | June 27, 2017—KB4022720 (Preview of Monthly Rollup) |
How to determine Integration Service Version at Host & Guest and State’s
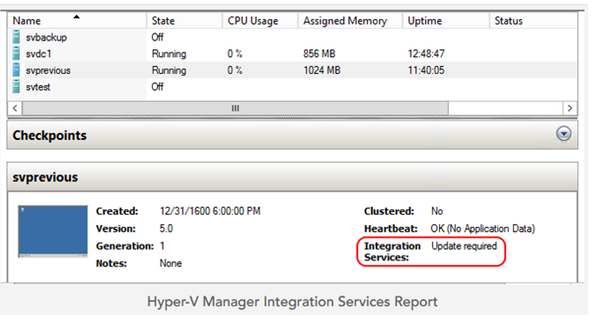
Integration Version states can be found in the Summary section in Hyper-V Manager Console or Failover Cluster Manager. IS states are “UpToDate, UpdateRequired, MayBeRequired & NotDetected”
How to determine Integration Service Version at Hyper-v Host(Management OS)
Option 1
To determine the version of integration services that is installed on the management operating system, check the registry key that has the version of the current Hyper-V Guest Installer: HKEY_LOCAL_MACHINE\SOFTWARE\Microsoft\Windows NT\CurrentVersion\Virtualization\GuestInstaller\Version\Microsoft-Hyper-V-Guest-Installer-Win60-Package. The value in the Data column is the version number.

Option 2
Login to Hyper-V Server and Go to the c:\windows\system32\VMMS.exe -> Check File version
Option 3
Login to Hyper-V Server -> Open Powershell with Runas Admin ->
Get-VM | select VMName, IntegrationServicesState
How to determine Integration Service Version from Guest OS (Inside VM)
To determine the version information for a guest operating system, log on to the guest operating system and check the version of the drivers installed in the \System32 folder. For example, C:\Windows\System32\drivers\vmbus.sys has a file version that should match the number found in the registry key on the management operating system.
Download Link : Hyper-V integration components update for Windows virtual machines
Linux Integration Services:
Hyper-V supports both emulated and Hyper-V-specific devices for Linux and FreeBSD virtual machines. When running with emulated devices, no additional software is required to be installed. However emulated devices do not provide high performance and cannot leverage the rich virtual machine management infrastructure that the Hyper-V technology offers. In order to make full use of all benefits that Hyper-V provides, it is best to use Hyper-V-specific devices for Linux and FreeBSD. The collection of drivers that are required to run Hyper-V-specific devices are known as Linux Integration Services (LIS) or FreeBSD Integration Services (BIS).
LIS has been added to the Linux kernel and is updated for new releases. But Linux distributions based on older kernels may not have the latest enhancements or fixes. Microsoft provides a download containing installable LIS drivers for some Linux installations based on these older kernels. Because distribution vendors include versions of Linux Integration Services, it is best to install the latest downloadable version of LIS, if applicable, for your installation.
For other Linux distributions, LIS changes are regularly integrated into the operating system kernel and applications so no separate download or installation is required.
For older FreeBSD releases (before 10.0), Microsoft provides ports that contain the installable BIS drivers and corresponding daemons for FreeBSD virtual machines. For newer FreeBSD releases, BIS is built in to the FreeBSD operating system, and no separate download or installation is required except for a KVP ports download that is needed for FreeBSD 10.0
Installing Hyper-V Integration Services for Linux Distributions that Do Not Ship with LIS Drivers and Services
You may find you need to install Hyper-V Integration Services in a Linux Distribution in the following cases:
- Linux distributions that do not ship with LIS already integrated
- When there is a new version of LIS available at the Microsoft site. The current Hyper-V Linux Integration Services version is 4.0
Since Linux can only understand RPM files for installation, the LIS ISO comes with the required RPM files to help in installing or updating the existing LIS components.
Important: Hyper-V LIS 4.0 is available in two formats: a Tar file (lis4-0-11.tar.gz) that can be transferred to the target Linux virtual machine or an ISO file (lis4-0-11.iso) that can be attached to the Linux virtual machine. We’ll explain how to install LIS 4.0 by attaching the ISO file. (Note: The previous Hyper-V Integration Services release, LIS 3.5, included only an ISO file).
The LIS installation process starts by attaching the LIS ISO to a virtual machine using Hyper-V Manager and then executing a set of commands to finish the installation as explained in the steps below:
- Attach the LinuxICv35.ISO file to a Linux virtual machine.
- As a root user, execute the command below to mount the ISO file: mount /dev/cdrom /media
- Next, run the script provided with the LIS ISO to install LIS: ./install.sh
- Finally, you need to reboot the Linux virtual machine so that the Hyper-V LIS components are initialized and registered successfully. To reboot, type “reboot” in the terminal and then press enter.
Once rebooted, use the “lsmod” or “Modinfo” command to check the status of LIS drivers and services as explained in the “Verifying Hyper-V LIS 4.0 Services and Drivers” section in this article.
Upgrading Hyper-V Linux Integration Services
Microsoft has provided upgrade scripts needed to update the Hyper-V LIS drivers for Linux distributions. Please follow the steps above to mount the ISO file and then execute the “Upgrade.sh” script after switching to the directory relevant to your Linux distribution.
Once the script has finished installing LIS drivers and services, reboot the virtual machine so that the Hyper-V LIS drivers and services are registered with the Linux kernel.
Verifying Hyper-V Linux Integration Services 4.0 Services and Drivers
After upgrading/installing LIS 4.0 on a Linux virtual machine, you can run the following command to verify the registration of the LIS drivers and services:
lsmod OR lsmod | grep hv
The above command should list the Hyper-V LIS drivers and services. You’ll need to look for hid_hyperv, hv_netvsc, hv_utils, hv_storvsc and hv_vmbus for the successful activation of LIS. The output of the command should look similar to this screenshot:
