Virtualization - Cloud

Month: January 2020

Azure AD/Accounts/Tenants/Subscriptions

This post aims to add some sense to the whole Azure account, subscription, tenant, directory layout as well as Azure AD (Azure Active Directory) across both ASM (Classic) and ARM. I will discuss the different administrator roles from an ASM (Azure Service Management) perspective and then take a look at the new changed/updated administrator roles with ARM (Azure Resource Manager).

Access control in Azure starts from a billing perspective. The actual owner of an Azure account – accessed by visiting the Azure Accounts Center – is the Account Administrator (AA). Subscriptions are a container for billing, but they also act as a security boundary. No matter ASM or ARM, every Azure subscription has a trust relationship with at least one Azure AD instance. This means that a subscription trusts that directory to authenticate users, services, and devices. Multiple Azure subscriptions can trust the same directory, but a subscription trusts only one directory.

As for the directory, the directory that Azure uses is Azure AD. Azure AD is a separate service on its own which sits by itself and is used by all of Azure (ASM & ARM) and also Office 365. Even though there is one Azure AD, there are two subscription/authentication modes of Azure.

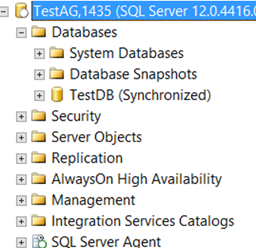
If you signed up to Azure using a Microsoft account, then you will get Azure with a Default Directory which you can see in the classic portal.

2016-06-01

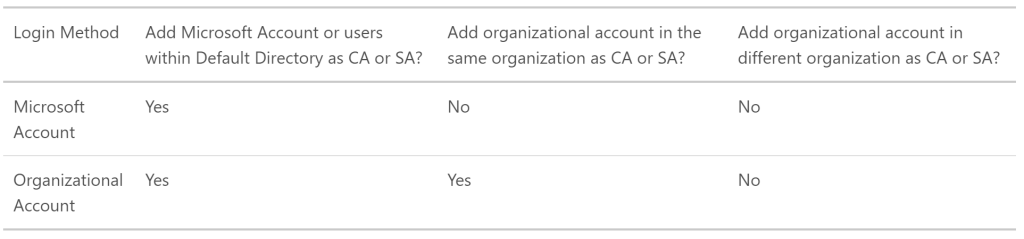
This Default Directory is just like normal Azure AD, however you can’t add anyone to any ASM/ARM Azure administrator role picked from this Default Directory itself, you can only add people to ASM/ARM Azure administrator roles using their Microsoft Accounts.

The opposite to this, if you signed up to Azure using the alternative methods then you can add people to ASM/ARM Azure administrator roles using both their Microsoft Accounts and/or Organisational Accounts. Until recently, you could only sign up for a new Microsoft Azure subscription using your Microsoft account (Windows Live ID). Azure now supports using either of the following two account methods to sign up: Microsoft Accounts or Work or school accounts, see https://azure.microsoft.com/en-us/documentation/articles/sign-up-organization/

2016-05-31_1505

However if you do have the limited Default Directory, you can create a new Azure AD directory under the subscription, then you can change the default directory in which the Azure subscription uses. This will then allow you to add both Work/School and Microsoft Accounts. How? See https://support.microsoft.com/en-au/kb/2969548

There are separate roles for Azure AD as follows, remember these have nothing to do with Azure itself. The following are the different Directory Administrator roles.

  • Global Administrator
  • Billing Administrator
  • Service Administrator
  • User Administrator
  • Password Administrator

Then there’s Azure itself. With Azure there’s the subscription to Azure itself which is more of a billing thing, this is where Azure based roles come in.

The Azure based roles are slightly different considering what Azure platform you are using, whether ASM(Azure Service Management (Classic)) or ARM (Azure Resource Management).

ASM (Azure Service Management (Classic))

Remember, depending on how you signed up with Azure, you can add both Organisational Accounts to these roles as well as Microsoft Accounts, or just Microsoft Accounts.

  • Account Administrator
  • Service Administrator
  • Co-Administrator

Each subscription has a Service Administrator (SA) who can add, remove, and modify Azure resources in that subscription. The default SA of a new subscription is the AA, but the AA can change the SA in the Azure Accounts Center.

Subscriptions have an association with a directory. The directory defines a set of users. These can be users from the work or school that created the directory or they can be external users e.g. Microsoft Accounts. Subscriptions are accessible by a subset of those directory users who have been assigned as either Service Administrator (SA) or Co-Administrator (CA); the only exception is that, for legacy reasons, Microsoft Accounts (formerly Windows Live ID) can be assigned as SA or CA without being present in the directory.

Azure Subscription Layout

This diagram takes a step above the Azure Account / Tenant level into the Enterprise EA level just so you can see the overall perspective from the entire hierarchy. However, many of you would be setup with Azure in the middle (account) level by possibly using a credit card or other type of licensing. Or some might be setup with the bottom level only in the case of CSP licensing.

Here’s the reference URLs I got the information from:

How Azure subscriptions are associated with Azure Active Directory
Understanding resource access in Azure

ARM (Azure Resource Management)

How does the above ASM based Classic roles tie in with Azure Resource Manager roles? Remember, Azure AD remains the same with the same Directory Administrator roles, the difference being the different administrator roles on the Azure ARM platform.

2016-05-27_1656

The built-in core roles are as follows and have no affiliation or access to ASM:

Owner: Let’s you manage everything, including access to resources

  • Closest ASM match: Service Administrator

Contributor: Let’s you manage everything except access to resources

  • Closest ASM match: Co-Administrator

Reader: Let’s you view everything, but not make any changes

AzureARMroles

Azure Enterprise Enrolment – Hierarchy

The Enrolment

Managed using http://ea.azure.com

At the very top-level from a licensing perspective, you can have multiple Azure Enrolments, here you can select the enrolment you want to work with. You need to be an Enterprise Administrator to access this. There can be an unlimited number of Enterprise Administrators.

Azure Enrollment

The other thing you need to do is change the Enrollment Authentication Level to ‘Mixed Account‘ so that you have the ability to add both Microsoft Accounts and/or Work or School accounts as Account Administrators.

Azure EA Auth Level
2016-06-03_1056

The Department

Also managed using http://ea.azure.com

Once you select the Enrolment you are working with, you then select ‘Department‘ at the top. This is where you can see all the departments in which you are the Department Administrator for and you can setup more departments which can be setup as a logical segmentation of a company or application.

The Department

The Account

The Account

To save some confusion, this part is not a generic account (like what a department and subscription is), but more so an individual account for a person, who will ultimately become the Azure Account Administrator. The AA can manage and setup Azure subscriptions, at which point will also become – by default – the Service Administrator for the subscription as well at the time of subscription creation.

Notice, this part is managed using two portals.

You will use http://ea.azure.com only to first setup the Account Administrator under the relevant department, whether it be a Microsoft Account or a Work/School (Organisational) account, this is where you do it.

2016-06-03_1015

At this stage, once you add in the account, it can take up to 24 hours for it to actually add itself in and will sit at ‘pending‘ for a while.

2016-06-03_1010

Once it goes through and gets setup, the email you used when adding the Azure account administrator, that person will get an email to acknowledge being added as an Azure account administrator with a link to logon to the Azure Account portal.

20181017-azure-account-administrator-addition.png

You can speed up the process, if you get the new Azure account administrator to logon to http://ea.azure.com with their account, it will ask them to confirm – with a warning. If the new Azure account administrator has other subscriptions anywhere else e.g. Pay-As-You-Go, then these will all get transferred to under the EA at this time including all billing for the Azure subscription, so be careful!!! If the new Azure account administrator doesn’t manage any Azure subscriptions, then you don’t really need to worry about the warning.

Please note: at this point, even through that adding a work/school account from an Azure AD directory is an option, the ‘directory‘ doesn’t have to have any affiliation with the EA, nor does the Microsoft Account. In saying this, you can use an account from a new Azure AD directory, or an existing Azure AD directory, e.g. if you are using Office 365 and AD Connect to sync on-prem accounts to Azure AD, you can use any of these accounts.

Once the account has been completed being setup, the Account Administrator will get an email.

The Subscription

All Azure subscriptions can then be created and managed by the Account Administrator and this is all done by using the Azure Account portal  http://account.windowsazure.com  then by clicking on ‘Account‘ at the top.

Azure Account

From here you will notice you have the option of adding a new subscription.

Or, you can edit an existing subscription. If you click on an existing subscription, by default all Azure Enterprise based subscriptions are named ‘Microsoft Azure Enterprise‘. You have the option to ‘Edit Subscription Details‘.

2016-06-03_1031

Here you can rename the Azure subscription or rename the Azure subscription in the Azure portal. Also under ‘Edit Subscription Details‘ you change the Service Administrator to someone else. Remember that with all new Azure subscriptions which are created by the Account Administrator, Azure stamps the Account Administrator as the Service Administrator by default, this is where you change that.

The Azure Hierarchy

And this is the whole thing visually.

Enterprise Enrollment Hierarchy

A few pointers:

As long as you remember that an Azure directory (also referred to as AAD/Tenant) is totally separate to the Azure subscription.

Imagine you wanted to transfer an Azure Subscription from PAYG to an EA while keeping the existing directory.

  • You would follow this article, tick Retain this subscription within my Azure AD – however the account owner you are transferring it to, this person would need to exist in the current tenant attached to the incoming subscription otherwise they would get another error The requester has specified that the subscription be retained within their organization. Please contact the requester and ask them to either update their request or add you to their organisation….

Imagine you had your EA set to Microsoft Account mode and you wanted to add a new Accountwhich was a Work or School account.

  • You would get an error like this: The login information provided is not a valid user. If you believe you have received this message in error, please contact customer support. Simply change the EA to be set for Work or School Account Cross Tenant authentication. If you have Microsoft accounts already setup as other account owners, this won’t break these accounts.

MS SQL AlwaysOn Availability Groups Implementation: Step by Step Process

An availability group supports a failover environment for a discrete set of user databases, known as availability databases that fail over together. An availability group supports a set of primary databases and one to eight sets of corresponding secondary databases. Secondary databases are not backups. Continue to back up your databases and their transaction logs on a regular basis.

Always ON Availability Group technology is based on Mirroring Technology. Availability Group is improved version of Mirroring. Availability Group is a HA (High Availability) and DR (Disaster Recovery) solution.

Prerequisites required to enable SQL Server 2012 Always On Availability Groups

  • Dedicated domain user account be created for use by the SQL Server service. This should just be a regular or domain account 
  • Having separate accounts for SQL Agent service, SSRS, SSIS & SSRS. Having separate account is more secure and resilient, since a problem with one account won’t affect all of the SQL Server Services 
  • Both SQL & OS Editions, Versions should be at same level on all participating nodes
  • Always on availability groups is only supported in Enterprise edition starting from SQL server 2012 ( except SQL 2016 it supports basic availability group in standard edition)
  • Recommend to have same collation on all replicas
  • Create shared network share on all participating nodes
  • Make sure your databases are in Full Recovery Mode, not Simple or Bulk Logged
  • Databases included in your AlwaysOn group must be user databases. System databases cannot participate in AlwaysOn Availability Groups.
  • Make sure full backups of each of your databases are made prior to installing AlwaysOn
  • No cluster shared volume is required for Always on, it can be configured in local disks
  • Make sure you have a seperate NIC’s for public and private communication
  • Additional NIC is required if you want to isolate always on replication traffic to dedicated NIC
  • Make sure you have two free IP’s each for windows cluster IP and Always on listener IP

Note: (Additional Points to consider)

  • Nodes in cluster (Ex: here 2 servers) must have drives of the same size and with the same name. There must be the same paths inside the drives. The reason is that; To get a database to SQL Server Availability Group, it is more convenient to have the same drives and paths on the secondary server
  • The Windows Cluster Account (Windows Cluster’s name) installed on these 2 servers needs to be granted the Create Computer Object privilege in the OU (Organization Unit) where these 2 servers reside in Active Directory.
  • If you do not give Create Computer Object permission to Windows Cluster, you will get an error as below when creating a listener. The WSFC cluster could not bring the Network Name resource with DNS name ‘XXXXX’ online. The DNS name may have been taken or have a conflict with existing name services, or the WSFC cluster service may not be running or may be inaccessible. Use a different DNS name to resolve name conflicts, or check the WSFC cluster log for more information
  • Create file share for backups and replicas: If you’ve ever setup log shipping you know you have to have a file share on a server and this is the same for this new feature. Create a file share on one of the servers and give read/write access to all your service accounts. Once clustering is setup, 2012 is installed and configured, we can create our first Availability Group for Always On.

AlwaysOn Availability Groups require a Windows Server Failover Cluster, we first need to add the Windows Failover Cluster Feature to all the nodes running the SQL Server instances that we will configure as replicas

We have two node windows failover cluster SQL1 & SQL2 already setup as shown in below screenshot.

Once you have installed failover cluster we can now proceed with enabling the AlwaysOn Availability Groups feature in SQL Server 2012. This needs to be done on all of the SQL Server instances that you will configure as replicas in your Availability Group.

First, we need to enable Always ON Availability Group on two instances. If you do not activate, you will receive an error as follows.

The AlwaysOn feature must be enabled for the server instance” before you can create an availability group on this instance..

To enable Always On Availability Group, we open SQL Server Configuration Manager with Run As Administrator. In SQL Server Services, we right-click on the instance and click properties.

In the tab that opens, select AlwaysOn High Availability, click Enable AlwaysOn Availability Groups and click OK to activate Always On Availability Group. We need to perform this process on the two servers for Always On Availability Group. This will require a service restart. You can restart your sql server services in a controlled manner.

After activating Always On Availability Group in two servers, we click New Availability Wizard from AlwaysOn High Availability on SSMS as follows.

We need to give a name to AG in the incoming screen. I named it “IlkAG”. We’re moving forward by clicking next.

In the incoming screen, we select the databases that we will include in AG. The status of the databases that are suitable for receiving AG appears in the form of “Meets prerequisities”. We’re choosing TestDB.

On the next screen, in the Replicas section, click Add to connect to the second instance of Availability Group. Make sure that the instance names are the same. For example, if your primary server is “Server1\Instance1”, your secondary server should be “Server2\Instance1”. In other words, the name of the named instance on both servers is Instance1.

After the connection is complete, you should see a screen as follows.

Since we want to set the AG to be synchronous and automatic failover, we mark the required fields as follows.

For now, we leave Readable Secondary as “No”.

After performing the operations on the Replicas tab, we switch to the Endpoints tab and a screen like the one below is displayed.

.

To set Always On Availability Group, if you use more than one instance on the same server, you will need to use a different endpoint port for each instance. The default endpoint port is 5022.

For example, you have 3 instances. When creating the availability group for the first instance, the default port is 5022. You must change the port from the Enpoint URL when you create a availability group for your second instance. You can use 5023 for the second instance and 5024 for the third instance. We will use port 5023 for the instance in our example.

Then we go to the Backup Preferences tab and we see a screen like the following. This screen asks for the preferred instance to get Backups. You must choose one of them.

Prefer Secondary If there is an active secondary server, automated backups are performed from the secondary server. If there is no active secondary, it is performed from the primary server.
Secondary only All automated backups must be performed from the secondary server.
Primary All automated backups must be performed from the primary server.
Any Replica Backups can be performed from primary and secondary.

I just select Primary and I’m going to the Listener tab without any further changes.

What is Listener?

There should be minimum 2 instance in Always On Availability Group architecture. The application must always go to the server where the database is active. It is the listener that provides this. Listener has a virtual name and a virtual IP. The application does not know the physical names and physical IPs of 2 servers in the Always On Availability Group architecture. The application only knows the listener name or IP.

When the Listener screen opens, we give a virtual name from the “Listener DNS Name” section as follows.

In the Port section, I give the port information that the application will connect to the databases on this AG. In Network Mode, select Static IP and click Add on the bottom and write my virtual IP. Applicants will know this IP as their database IP.

You can ask your network unit for IP. If you give IP that someone else uses, you will have trouble.

I’m proceeding by clicking Next. In the next screen, it asks us how to do the synchronization with the secondary database in the first stage.

If we choose Full;

It will automatically take the full backup and log backup of each database we selected and transfer these backups to the secondary server itself.

This requires a shared folder. Two instance’s SQL server service accounts must have read and write privileges on this shared folder.

If we choose Join only;

We need to manually take full backup and log backup of each database we selected and transfer it to the secondary server before passing this step.

 If we choose Skip initial data synchronization;

We need to manually take full backup and log backup of each database we selected and transfer it to the secondary server.

But we can do this later. I’ve never used this option until now. We’re choosing Full and click next.

On the next screen, necessary checks are performed. If there is a problem, you can solve the problem and click Re-run validation. To solve the problem, you can go back by clicking the Back button and correct the setting you made wrong and click next. There was no problem with our installation.


Click Next and then Finish. In my example, everything except the listener was created correctly.

When we click on Error near to ‘Create Availability Group Listener’ testAG ”, we can see the detail of the error as follows.

I usually set the port of the availability group to be the same as the instance’s port.

In our example, I set a different port to see what would happen if we set a different port from instance to the availability group.

You can see the error below.

Creating availability group listener resulted in an error.

Although it could not create Listener, it created AG. We can define it as described above by clicking Add Listener from the Availability Group Listeners.

The access information you will give to application developers (the database access information that they write to connection strings) is as follows: TestAG,1435 or “IP address you specify when defining a listener”, 1435

You can also connect via SSMS with this way. After the process is complete, you can see that the database is synchronized.

© 2024 Tech Blog

Theme by Anders NorenUp ↑