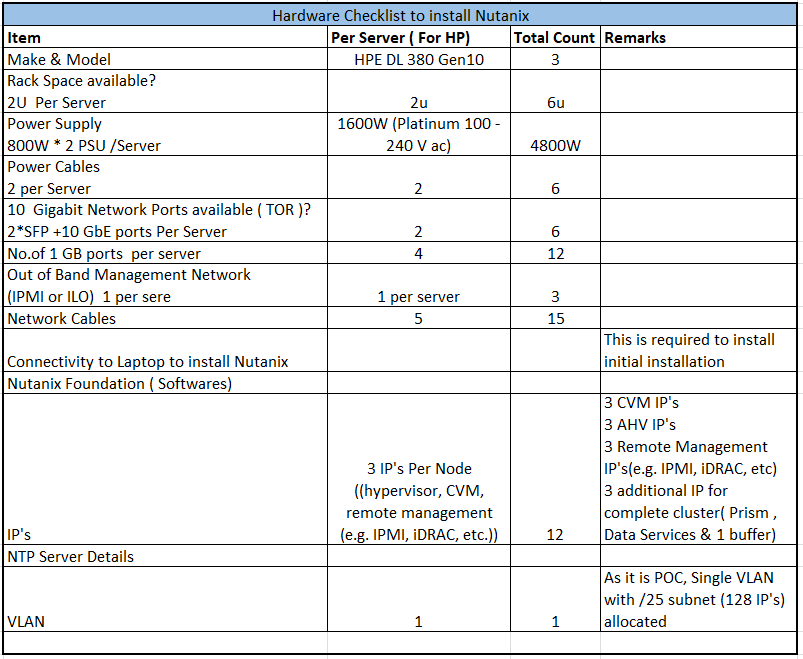
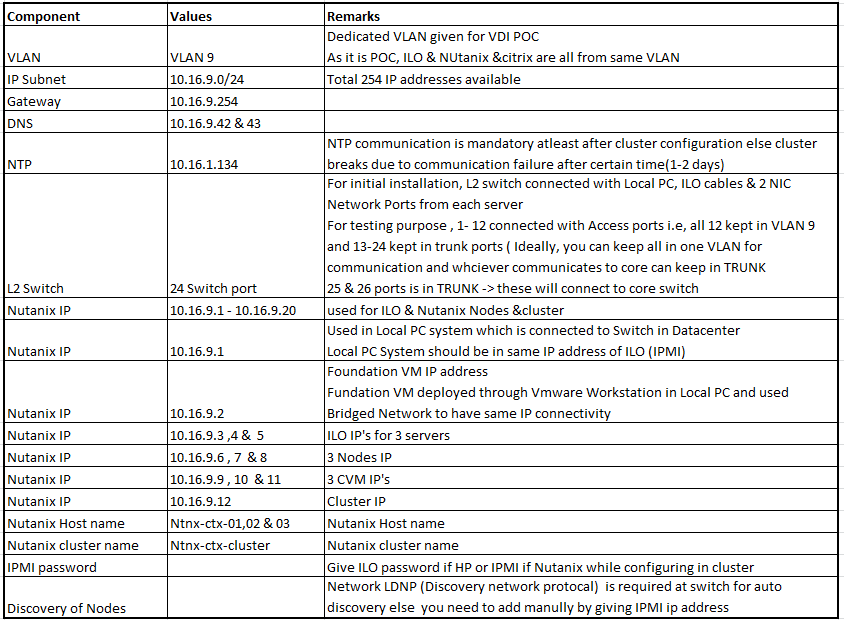
I have recently executed Citrix Virtual Apps & Desktop POC on Nutanix Hypervisor (AHV) platform, writing this post to share my technical knowledge gained in this project.
Post Installation of Nutanix, Installed Citrix Infrastructure components. I am not covering these installation steps in this post as many articles are available on internet.
This POC has a requirement of GPU workloads hence we have installed NVIDIA License server & NVIDIA Graphic drivers on host & guest machines. Follow below document to know the NVIDIA Installation procedure
This POC has a requirement of delivering Linux VDI workloads for CAD/CAM applications, Follow below post to know the VDA & Graphics installation procedure for Linux
I recently worked for one of the customer to Integrate On-prem Citrix Site (7.15) with Citrix cloud workspace and wanted to share my experience over this blog in simple steps
What is Site Aggregation for Citrix Workspace (Cloud Workspace)?
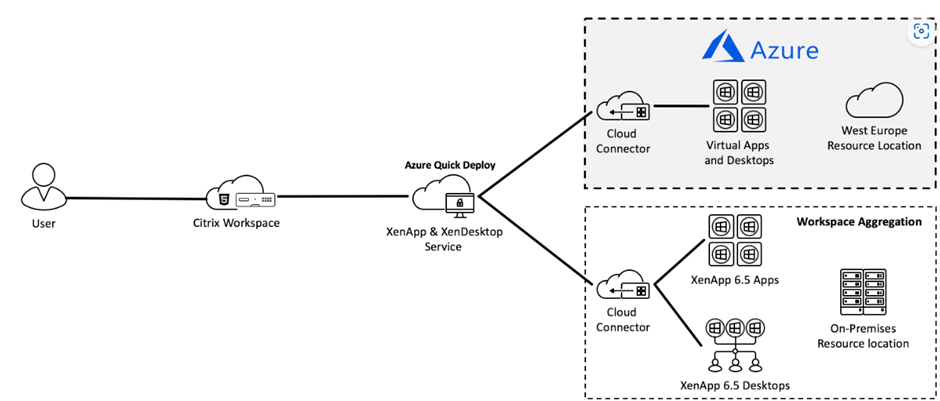
Site aggregation is a feature within the new Workspace experience that provides a simplified admin workflow that enables existing, on-premises Virtual Apps & Desktop deployments (inclusive of versions XenApp 6.5 and XenDesktop 7.X) to be aggregated into the new Workspace end-user experience. Once the workflow is completed, all apps and desktops associated with your traditional on-prem deployments will populate in the end-user’s workspace. All Citrix Workspace supported apps will live side-by-side traditional on-premises apps and desktops. End-users won’t be able to tell the difference between how the apps and desktops are hosted
What is the Value of Site Aggregation?
For customers maintaining hybrid environments, site aggregation helps deliver a single workspace with a modern end-user experience for traditional on-premises apps and desktops. End-users will have access to all their apps, services, and data via a single pane of glass, no matter how they’re hosted. By using the feature, these customers can also remove their dependency from on-premises StoreFront and use Citrix Workspace as their primary delivery mechanism, which is evergreen and highly-available.
For existing Citrix customers who want to try Workspace, site aggregation provides a low-risk approach to start using Citrix Workspace and cloud. And trying Workspace with traditional on-premises apps and desktops requires little additional effort or investment. These customers can continue maintaining Storefront on-prem while they test out a subset of users in Citrix Workspace. This means that customers’ on-premises Storefront can run in parallel with Workspace since no updates or changes are needed to Storefront.
For existing Citrix customers planning to migrate to Citrix Cloud services, site aggregation provides an initial step toward the migration process. Once aggregated, and the dependency on StoreFront is removed, end-users can continue to be productive by using Citrix Workspace, while admins plan and execute against their migration plan. They can begin redirecting and registering their VDAs to the cloud connectors instead of the on-premises brokers to move another part of their infrastructure to Citrix Cloud.
Conceptual Architecture
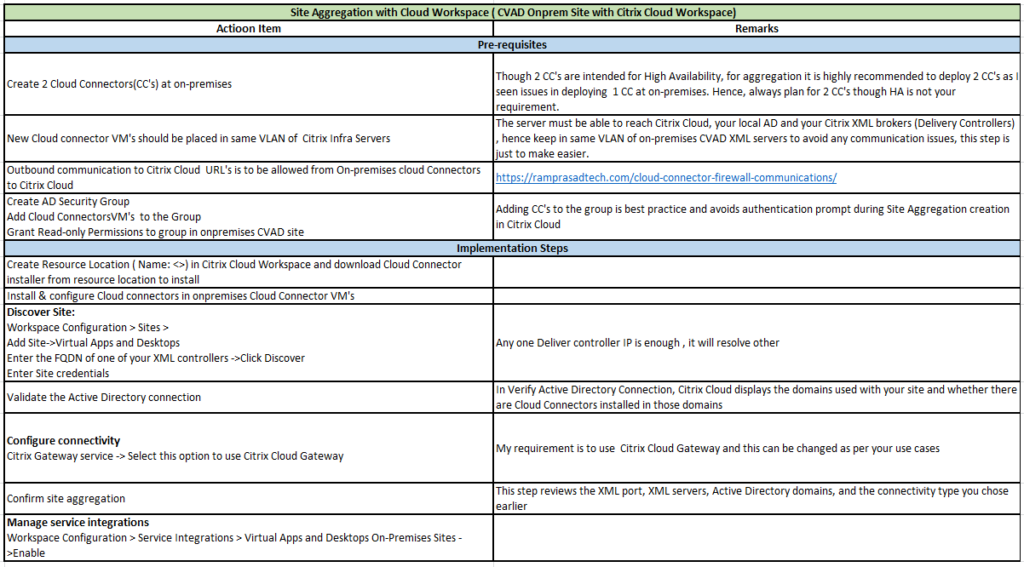
Below table provides Site Aggregation prerequisites and Implementation Procedures
Site Aggregation Implementation Steps
Click the below for Site Aggregation build screenshots
Virtual desktop infrastructure (VDI) is a technology that allows organizations to run operating systems on virtual machines, enabling users to access resources remotely. It has become highly important in the era of hybrid work. To make the most of each benefit a VDI implementation offers, it’s essential to consider several best practices for successful deployment.
How does desktop virtualization work?
Put simply, virtual desktop infrastructure (VDI) enables organizations to deliver user desktops and apps by executing functions on virtual machines hosted in datacenters. Each virtualized environment simulates a physical infrastructure, including an operating system and applications.
A VDI environment usually includes virtual machines (VMs), a hypervisor, an access method, and a connector to help users connect to the VDI workspace.
Advantages of Using VDI
There are several key advantages to implementing virtual desktop infrastructure.
Remote Access
With the significant growth of remote work in recent years, it is critical to implement a platform that can support anywhere, anytime work. VDI systems help organizations provide a seamless and secure digital workspace for employees, regardless of location and device — while also offering robust security, better performance, and more scalability.
Improved Security
One of the top advantages of VDI is robust security. Today, organizations are distributed and constantly expanding digitally across multiple platforms and devices. A single cyberattack can compromise thousands of users, costing millions in damages and reputation loss. VDI security can protect your IT infrastructure by hosting the data in a central system instead of end-user devices. Since all data is centralized, it’s easier to protect it and apply security policies.
Long-Term Cost Savings
Virtualization technologies optimize hardware investments by getting more users on fewer servers. VDI doesn’t require a significant investment in end-user devices, and you can get more life out of the devices you already have. In addition, VDI offers long-term savings that make it worth any initial costs associated with deployment. Licensing costs are lower using VDI because users can share a single application license across multiple virtual sessions.
A Seamless Experience
Another advantage of VDI is that it offers a seamless work experience for employees, with easy remote access to applications and resources. Delays and downtimes from maintenance or upgrades are minimal, since these are rolled out automatically to all virtual desktops. And with specialized optimization technologies, you can ensure voice, video, and graphics apps run just as smoothly in virtual desktops as they do on native devices. Employees can stay productive by becoming more agile and focused.
Centralized Management
With a VDI implementation, everything is managed from a centralized system. This means end users can have updates and new applications deployed to the central desktop image and automatically appear on authorized devices. IT admins can control application usage and permissions, and add or remove users when provisioning from a centralized dashboard.
How to Use VDI Effectively—7 Best Practices
Organizations that plan to implement desktop virtualization should consider the needs of the user and company as well as the user experience. Factors like availability are critical, as VDI performance relies on the server, not local processing power. Here are some tips to ensure the VDI’s best performance.
1. Understand end-user requirements
Before deploying VDI, consider how end users will interact with the virtual app or desktop. Map and evaluate usage patterns or different categories of users. For instance, what time of day do most users log in? Other factors to consider include:
Applications: Think about which applications end users will need to do their tasks. Each user, team, or department may require different applications and solutions for their job. Be especially mindful of unified communications applications and their correct redirection configurations to prevent server overload.
Number of users: Once you know which applications are needed for each team, it’s essential to know how many people will use each application. Traffic volume will impact your deployments and hardware requirements.
Equipment or hardware: Some use cases, such as 3D graphics, have specific requirements and may require high-end hardware or GPUs. Equipment requirements may also include peripherals like USB drives, printers, and scanners.
User profile needs: Identify which users require privileged access and where you need consistent profile settings between desktop sessions.
2. Ensure VDI is highly available
High availability is critical for a successful VDI implementation because employees and third parties use virtualized desktops for their daily activities. Modern hypervisors have characteristics that make them resilient. When using virtualization, all desktops depend on the backend VDI solution to be reliable. To prevent a single point of failure, you should have redundancy of resources to support reliable access and disaster recovery.
3. Monitor server performance
In addition to evaluating your users’ requirements, you’ll need to monitor server performance issues. Monitoring tools provide essential insights into a server’s workloads, resource shortages, and peak loads. Monitoring server performance can also help you identify which users or applications are placing an extra burden on the server. Monitoring can also help you plan for future improvements.
4. Upgrade server resources
Upgrade when necessary. From time to time, evaluate the server requirements according to your use case and scale accordingly. You have the option to leverage horizontal scaling, adding machines to your resource pool, or vertical scaling, adding more power to an existing machine, to expand your environment. For instance, if you have hundreds or thousands of users, the servers will require more CPU, memory, and network bandwidth than smaller networks. Your server resources need to be adapted to your organization’s needs. If your requirements are higher than your server resources, here are some tips:
Add more servers and divide the workload among them
Leverage public cloud hosted workloads to easily scale up and down based on user load
Add more processors, memory, or connectivity to the server
5. Reduce desktop display demands
VDI renders the screen on the server and then sends the image to the endpoint for display. So, when specific applications are visually intensive, they can put a strain on the virtual desktop performance. Reducing the visual requirements of the application can reduce the traffic demands of virtual desktops.
For instance, reducing the display resolution from 1920×1200 to 1280×1024 bits per pixel (bpp) can reduce the bandwidth needs from 2 gigabits to 629 megabits.
6. Use network performance monitoring
It’s also essential to monitor network performance. Network monitoring can help you identify the bandwidth demands of virtual desktops. Identify bottlenecks and demand peaks, traffic trends, and bandwidth usage and adjust your services accordingly.
7. Be mindful of endpoints
VDI enables organizations to deliver a consistent desktop experience to diverse endpoints and devices. This is especially important with the expansion of BYOD (bring your own device) policies. But while VDI is device agnostic, different users may need different resources.
How can you ensure device and user control for many device types? First, determine the device types you will support to access VDI. Once you have determined the devices, identify how you will secure them. For instance, you can establish clear policies that state which activities users can and cannot do.
It’s critical to monitor connections to the VDI from third-party devices to ensure anyone trying to enter the network follows security procedures. This way, you can detect any anomalous behavior and prevent data breaches.
How to choose the right VDI
Choosing the right VDI implementation for your organization will depend largely on your organization’s specific needs. Some of the best use cases for VDI include:
Remote workforces: Remote and hybrid environments are typical use cases for VDI. These workforces require connectivity to access resources and applications on their virtual desktops. VDI deployments offer a centralized location for the apps and data and offer high availability.
Task or shift work: Task workers can benefit from VDI when using non-persistent desktops, meaning they don’t save any personal settings. Shift workers, like mobile health professionals, typically use the same applications. Another example is contact center workers, which require frequent changes of station. VDI deployments make it easy to take a new station and access documentation and resources.
Graphic-intensive applications: VDI options that come with specialized optimizations can be a good fit for power users such as architects, graphic designers, and other teams that use graphics-intensive software. VDI deployments support GPUs and GPU resources that can be shared with multiple desktops.
Highly regulated industries: Companies in highly regulated industries, such as financial services firms and healthcare organizations, require a high level of security. VDI provides the comprehensive security policies these organizations need to prevent unauthorized access—and to protect against malware and other threats.
Shared resources: In many industries, sharing resources is a common practice. For instance, in computer labs or hospital kiosks, several employees can share the same desktop equipment in the same shift. VDI can help with the flexibility required to change users while keeping secure access to data.
For many organizations, there are also instances where desktop as a service (DaaS) is the best choice. Because this form of VDI is hosted in the cloud and managed by a third-party provider, it can be an ideal option for companies looking to lower upfront costs and offload maintenance.
Boost Productivity and Security with Citrix Virtualization
Citrix DaaS and VDI solutions are designed to meet the needs of an increasingly flexible workforce, and make it easy for companies to provide secure access to digital workspaces.
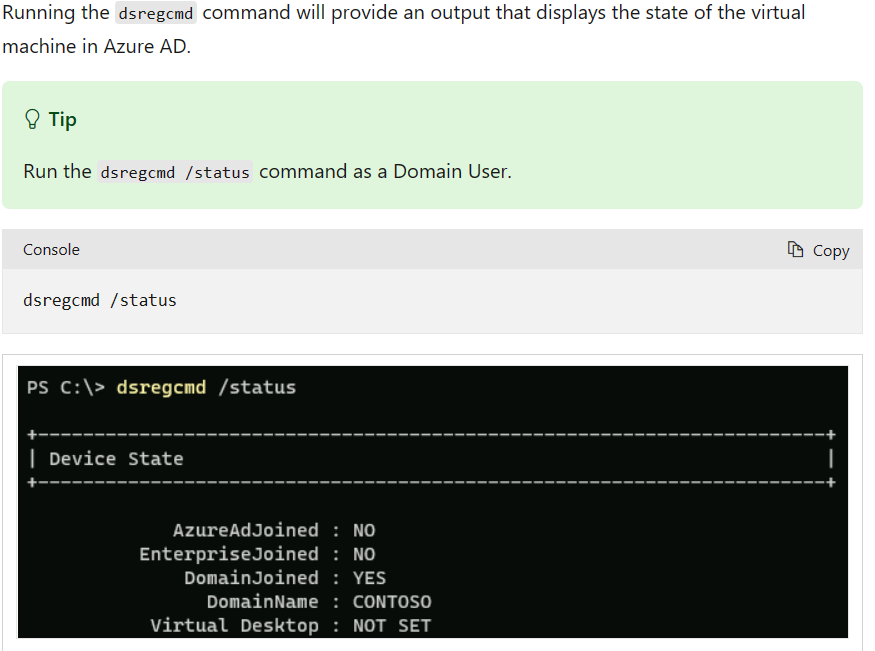
Users may be required to authenticate to their applications (for example, Microsoft 365 apps, Teams (work or school), OneDrive, etc.) at every sign-in. The repeated authentication prompts are due to the virtual machines Azure AD device state. We recommend virtual machines are Azure AD Joined (AADJ) or Hybrid Azure AD Joined (HAADJ) for the best user experience.
Virtual machines, which are AADJ or HAADJ create the user’s primary refresh token (PRT) at sign-in. Primary refresh token(s) created at sign-in will be used to authenticate to Azure AD based applications. Standard Domain Joined (DJ) virtual machines don’t create a PRT at sign-in, instead rely on the Microsoft Azure AD broker plugin.
Azure AD broker directories and apps
Starting in FSLogix 2210 (2.9.8361.52326) and later versions, all content stored in following locations is no longer roamed as part of the user profile.
The following articles are provided to help determine whether or not your virtual machines are configured to use primary refresh tokens as part of an Azure AD sign-in process.
When using non-persistent VDI, you need to prevent users from adding work or school accounts. Use the below registry entry to prevent adding these virtual machines to your Azure AD directory. Failure to do so will result in your directory having lots of stale Hybrid Azure AD joined devices that were registered from your non-persistent VDI platform resulting in increased pressure on your tenant quota and risk of service interruption because of running out of tenant quota.
Connecting to the Internet from your datacenters requires opening port 443 to outbound connections. The following list includes the addresses that are common to most Citrix Cloud services:
This list is grouped by product and includes a change log for each group of FQDNs
If Customer does not allow wildcard URL’s then below list of FQDN’s are should be allowed.
Note
Allowing FQDN’s in Firewalls may lead to an application launching issue as Citrix may add Gateway POP’s in backend at any time and this will not be updated to Citrix customers to allow newly added gateway services
Unfortunately, citrix has not provided detailed step by step procedure to install VDA on Linux distributions. There are so many articles published to install VDA on windows machines whereas not for Linux distributions.
In one of my recent project, I spent lot of time to install VDA on Red Hat Enterprise Linux due to lack of detailed documentation hence I am publishing below step by step procedure to install VDA on Red Hat Enterprise Linux.
This articles covers below components installation & configuration
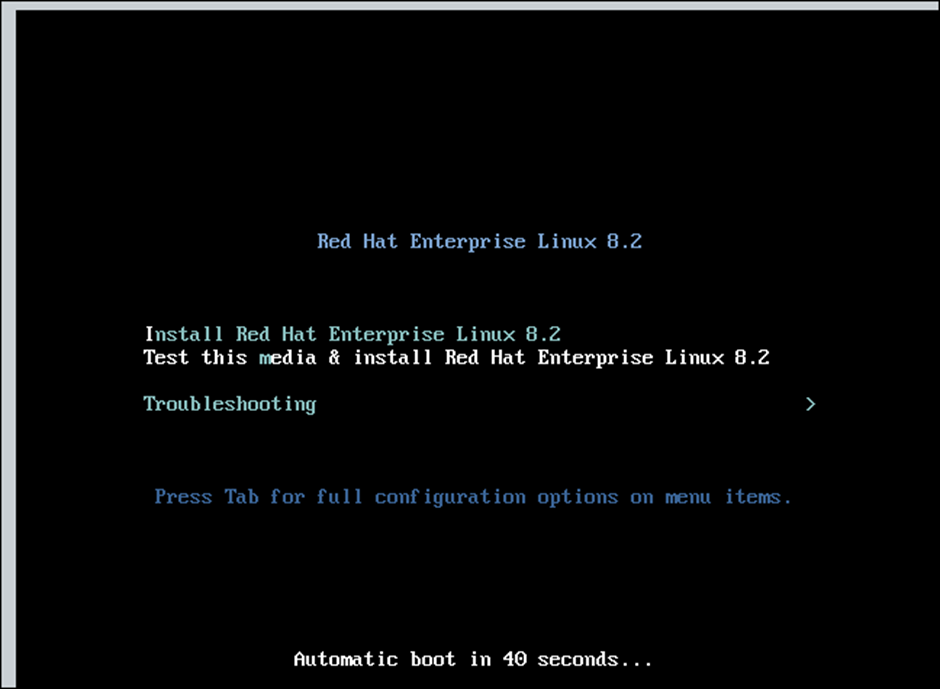
• RHEL 8.2 Linux Workstation VM Installation on Nutanix AHV • XenDesktop VDA 2203 Agent Installation & configuration • NVIDIA Graphics Drivers Installation • NVDIA vGPU licensing
The Linux Virtual Delivery Agent (VDA) enables access to the Linux virtual apps and desktops anywhere from any device where Citrix Workspace app is installed. Install the VDA software on your Linux virtual machines, configure the Delivery Controller, and then use Citrix Studio to make the apps and desktops available to users.
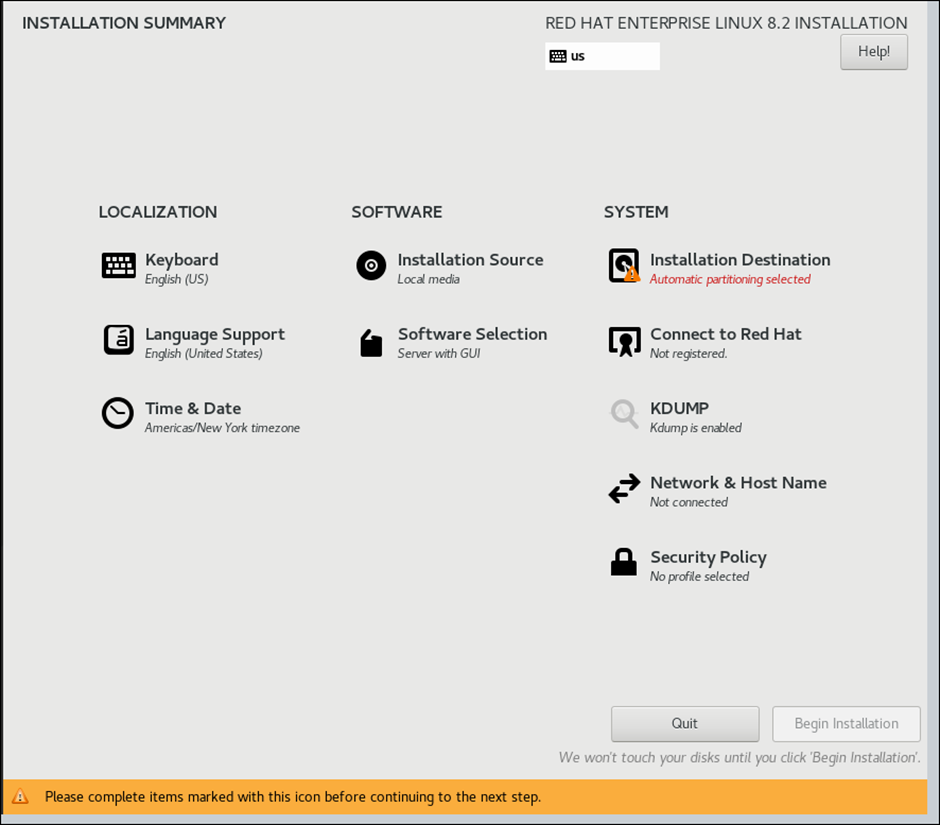
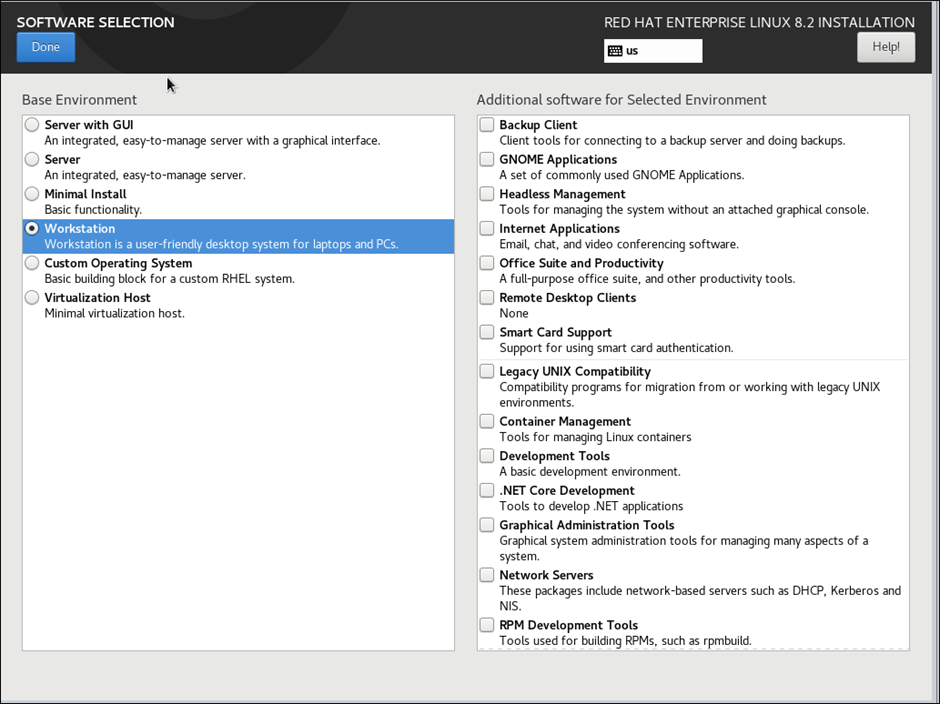
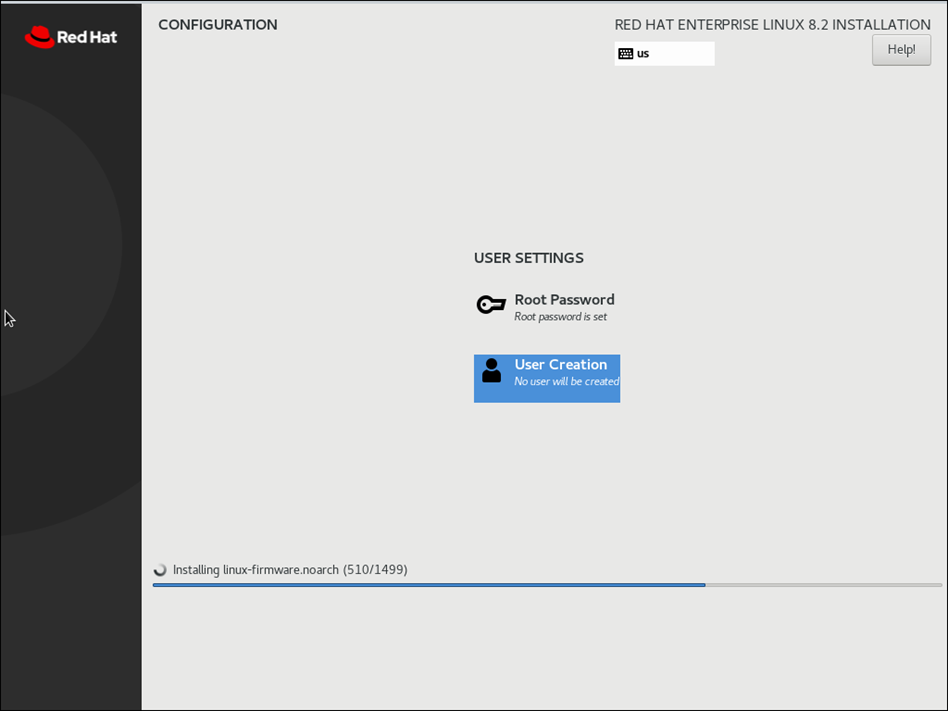
In above options, modify each installation setting based on requirement
As my requirement is Linux “Workstation”, I chosen “Base Environment” , choose options based on your requirement
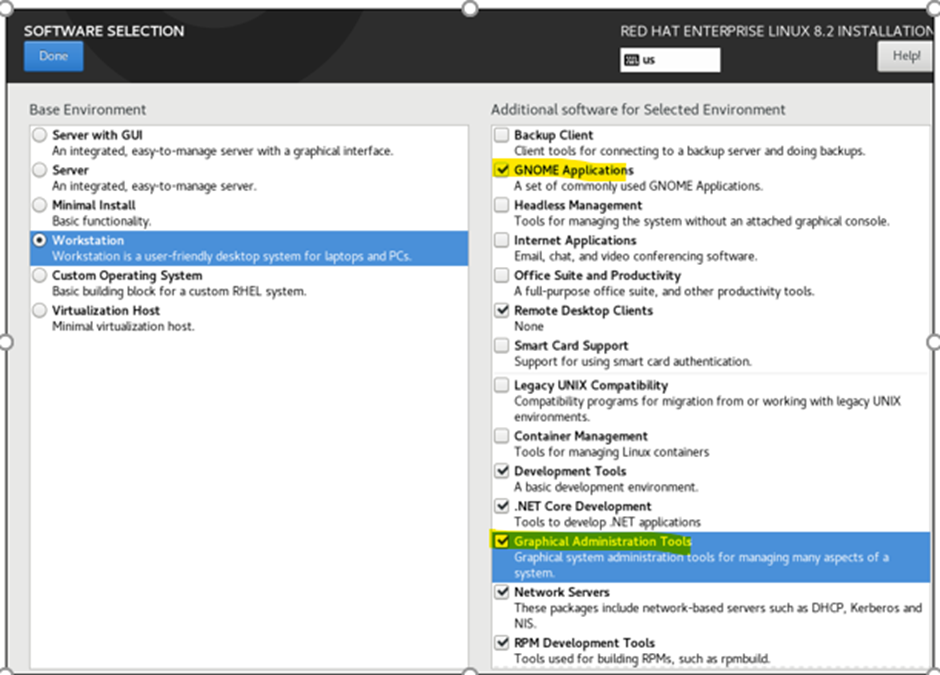
For VDA, choosing GNOME Applications & GRAPHICS Administration tools is sufficient. Choose based on your requirement
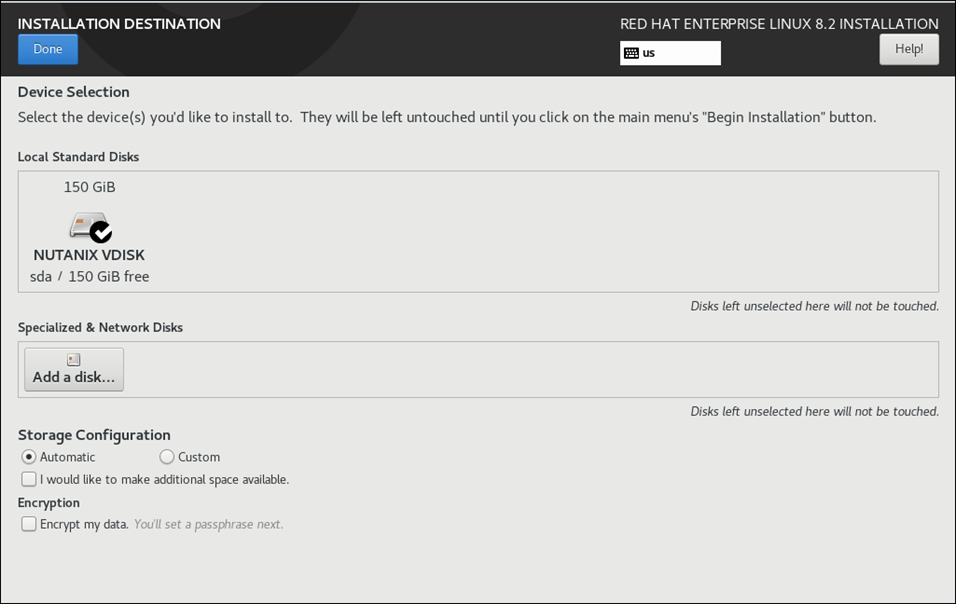
Select Automatic unless you have a specific requirements of partitions
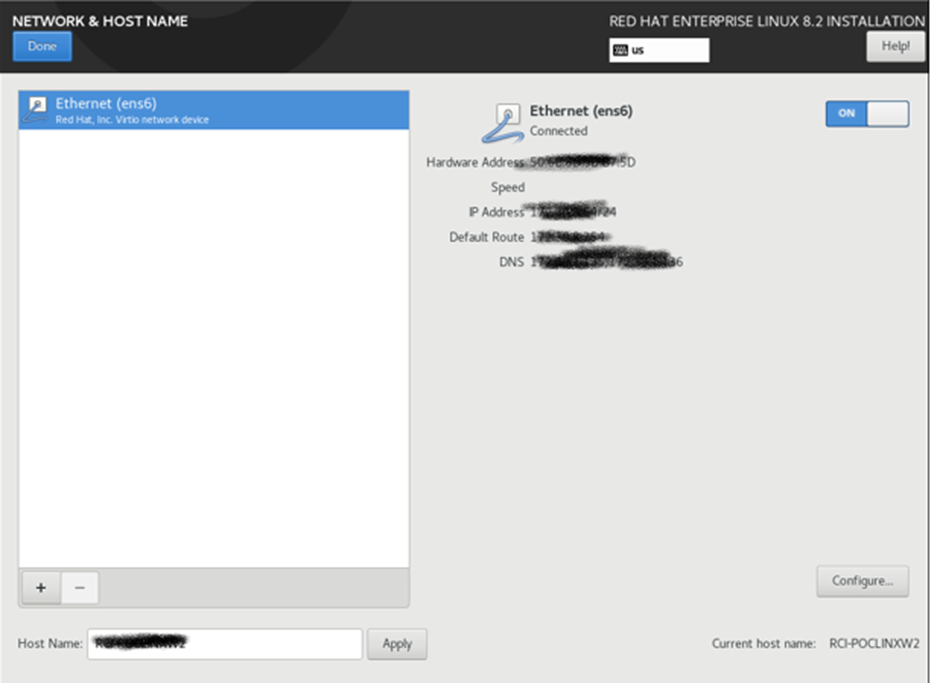
Enable Network to get IP from DHCP and Provide Hostname correctly at this page
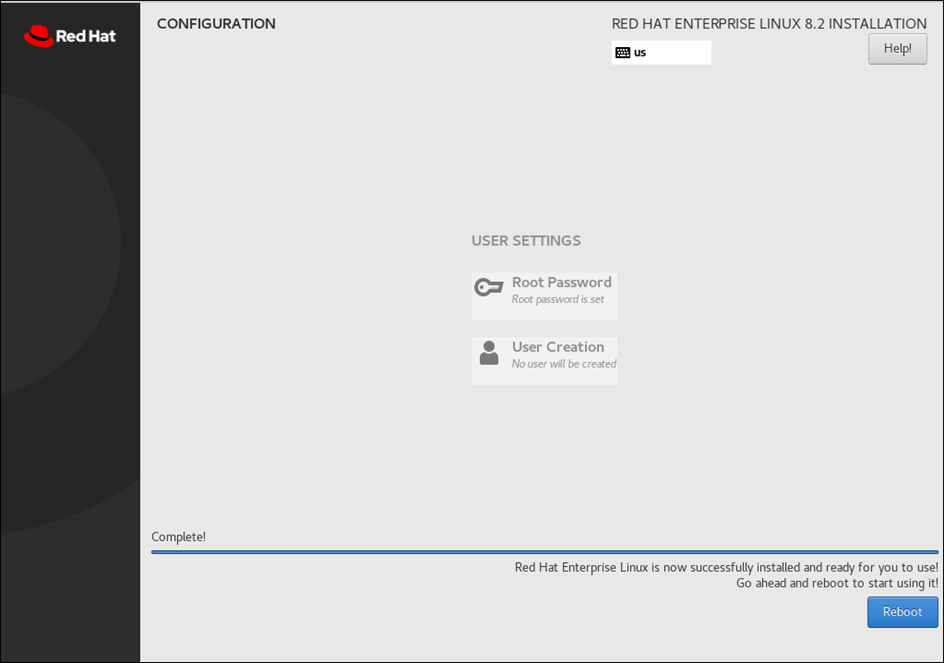
Post Selection of all options, you will see below output
Reboot VM post installation
Note:
My Citrix VDI setup do not have proxy connectivity hence to install packages and dependencies, I need to mount YUM repository from locally mounted ISO which avoids internet connectivity for any RPM installations. Ignore YUM repository steps if VM able to connect internet
Steps to mount YUM repository locally
Mount the RHEL installation ISO to a directory like /mnt/disc, e.g.: mkdir -p /mnt/disc mount /dev/sr0 /mnt/disc
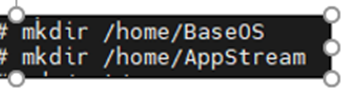
Create below directories to copy repositories
mkdir /home/BaseOS mkdir /home/AppStream
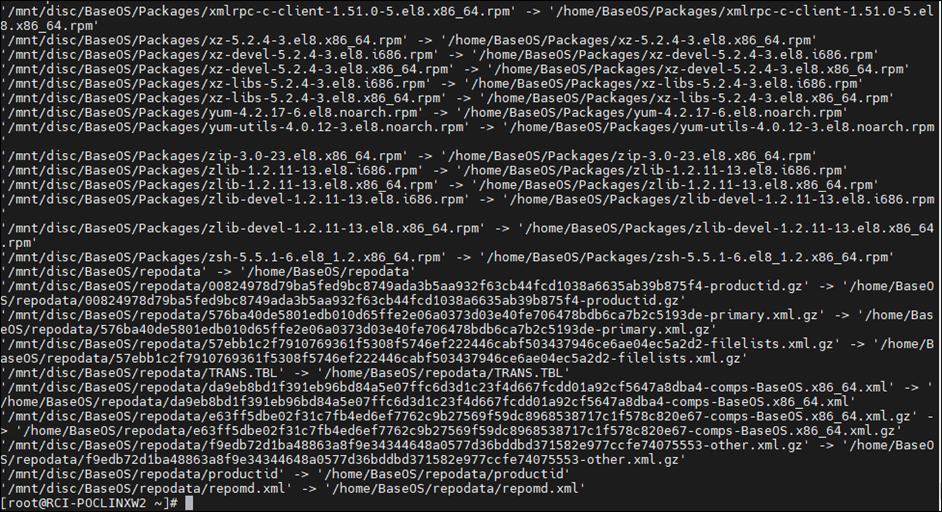
Copy the media.repo file from the root of the mounted directory
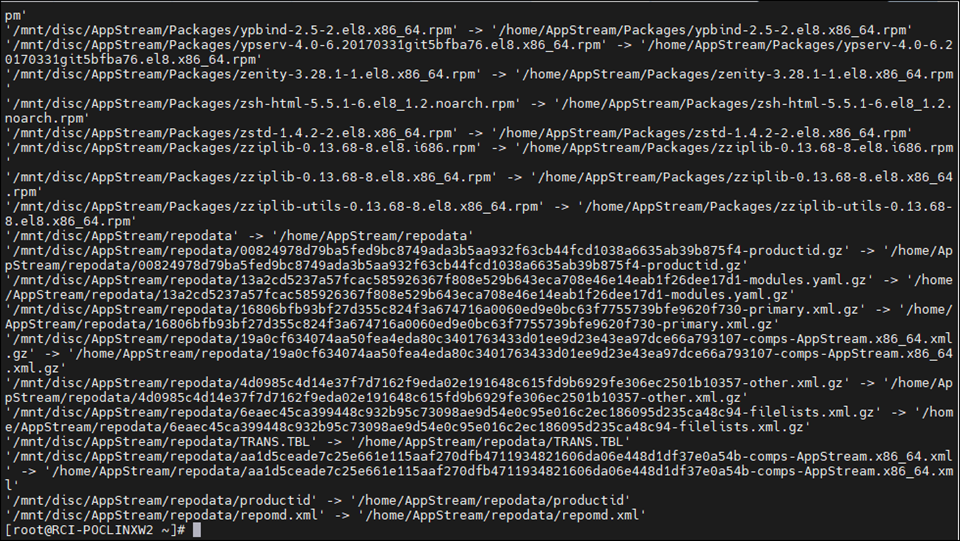
cp -ivr /mnt/disc/BaseOS/* /home/BaseOS/
cp -ivr /mnt/disc/AppStream/* /home/AppStream/
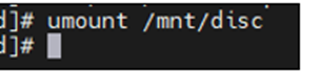
Unmount /mnt/disc -> do after copying files
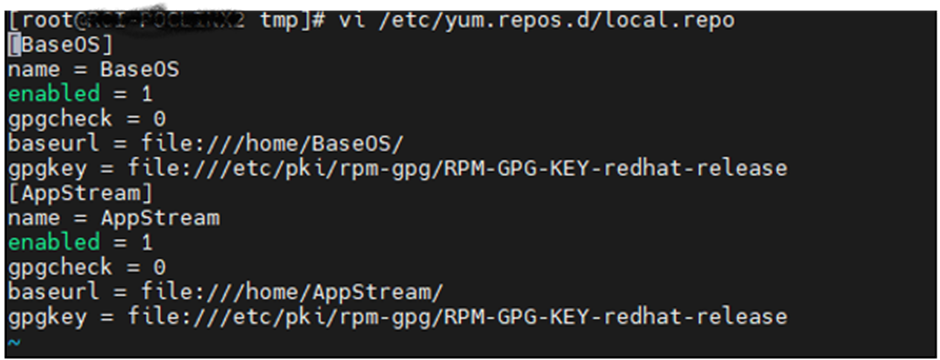
Delete files if any found under directory /etc/yum.repos.d/ and create the file vi /etc/yum.repos.d/local.repo
Note: you should have only local.repo file under /etc/yum.repos.d/ Copy and Paste the below text in local.repo
Upload aspnetcore-runtime file to /root directory and execute below command to extract dotnet runtime cd /root mkdir dotnet chmod 777 dotnet ( Note : command to change directory permissions)
Extract runtime to /root/dotnet with below comand
tar -xf aspnetcore-runtime-6.0.3-linux-x64.tar.gz -C /root/dotnet
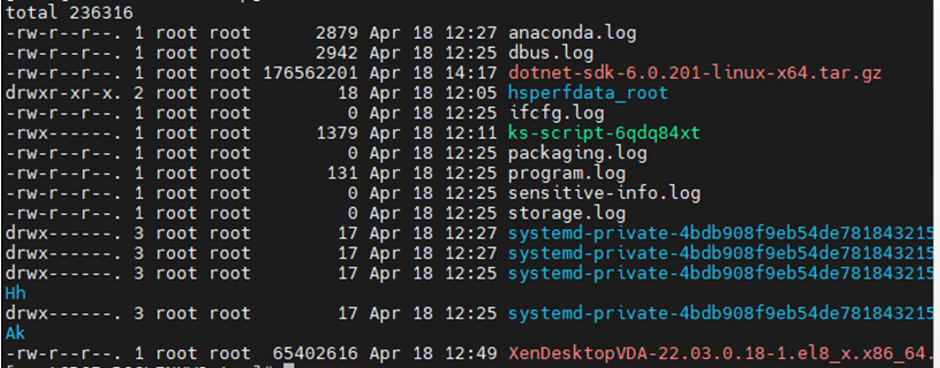
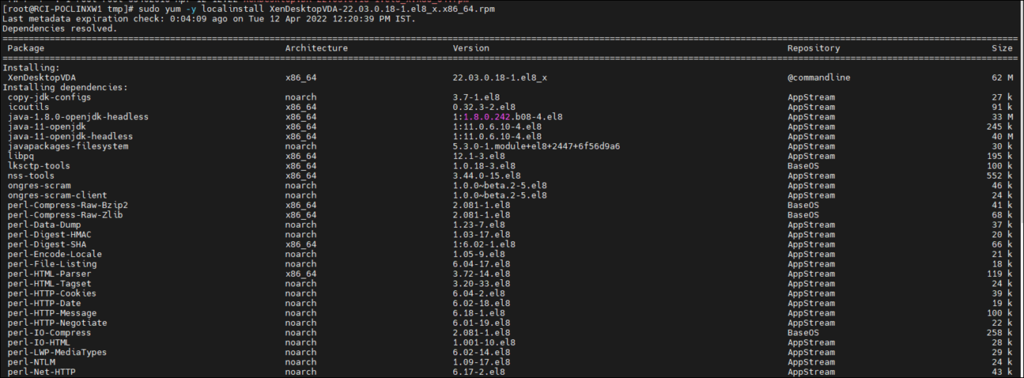
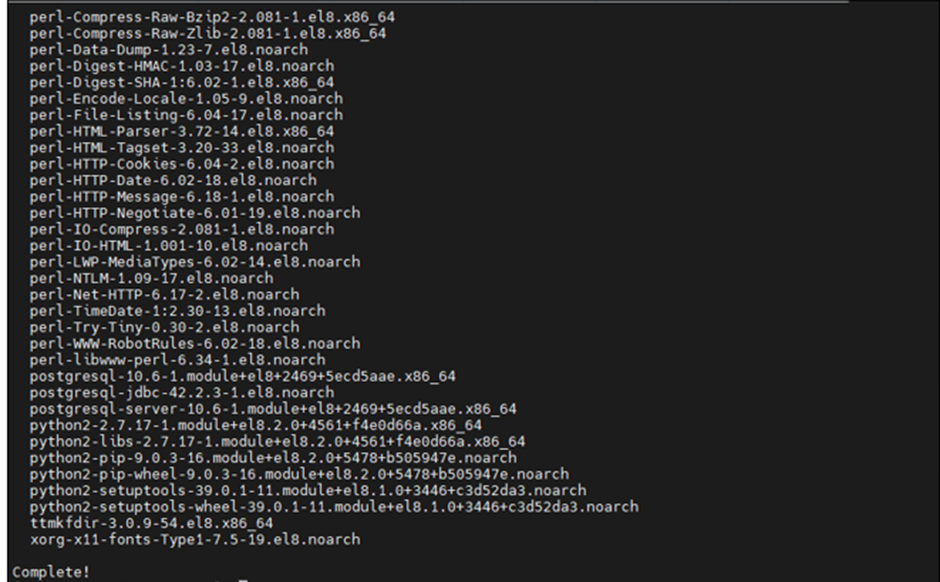
Download “XenDesktopVDA-22.03.0.18-1.el8_x.x86_64” and upload XenDesktop VDA file to /tmp directory Note: The version used is Linux Virtual Delivery Agent 2203 an DDC version is 2112
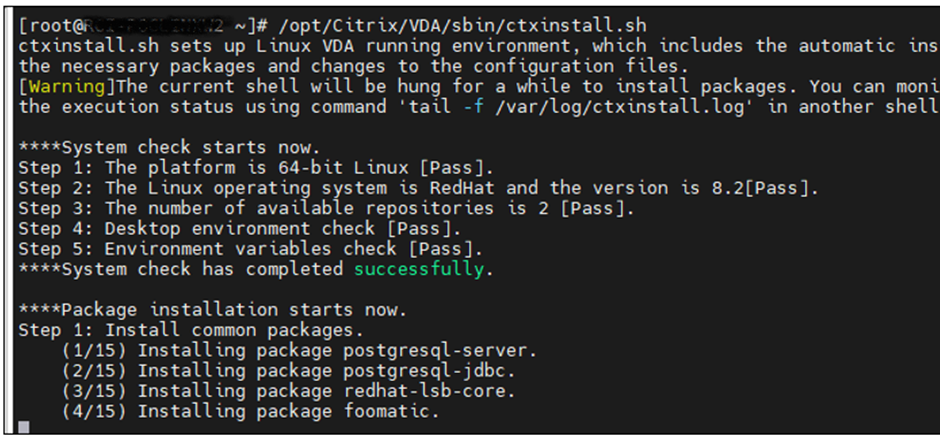
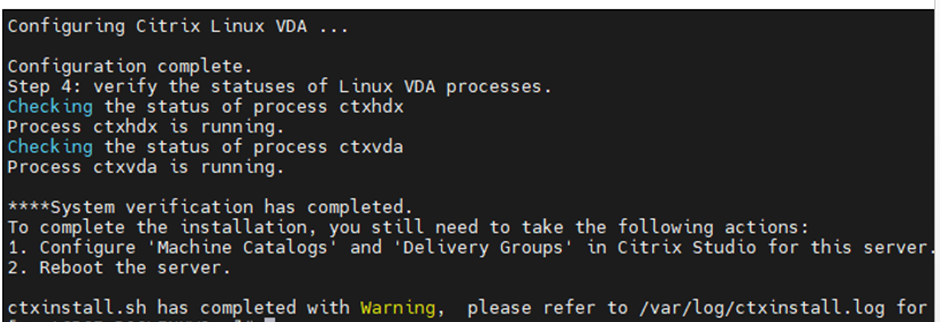
Post installation of VDA, configure the VDA with below command
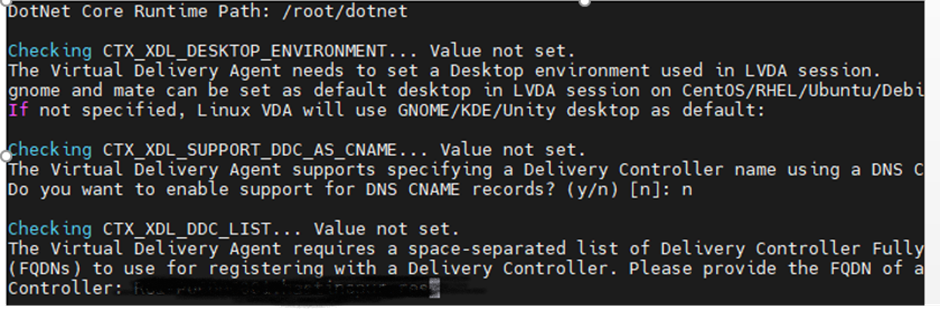
/opt/Citrix/VDA/sbin/ctxinstall.sh
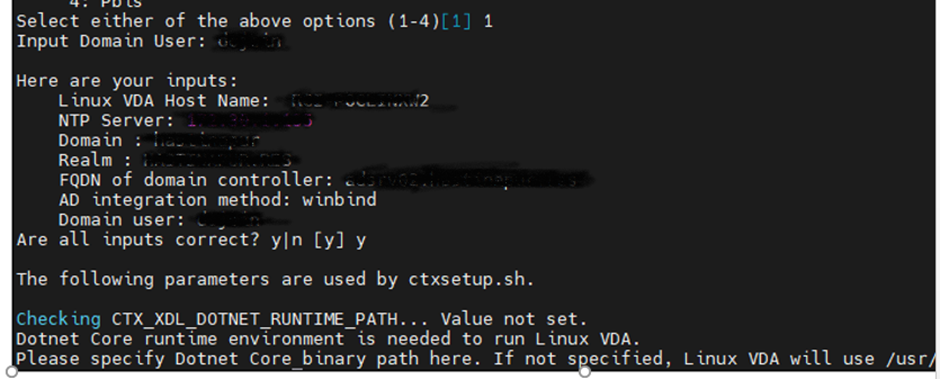
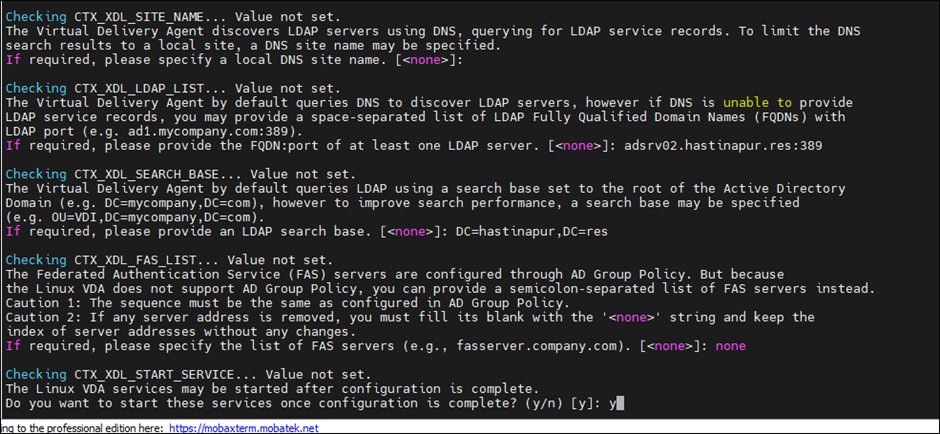
Input below values during configuration • Host name of the machine on which the Linux VDA is to be installed • IP address of DNA • IP address of NTP Server • Domain name – The NetBIOS name of the domain • Realm name – The Kerberos realm name (Note: Name should be in CAPITAL LETTERS) • Fully Qualified Domain Name (FQDN) of the domain controller
While configuring VDA, it prompts for dotnet core runtime path, set the dotnet Core Runtime path as “/root/dotnet”
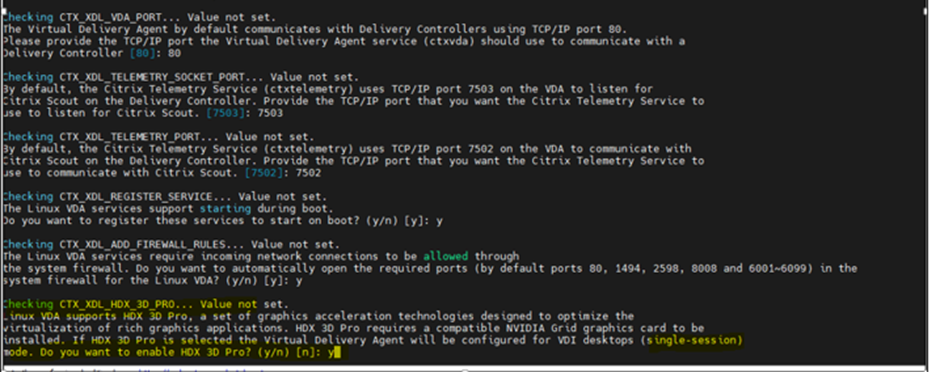
Note
• As my requirement is for graphics (GPU), here I selected “Y” HDX 3D pro.Select “N” if VDI do not require Graphics • Linux multisession does not support “HDX 3D PRO” select “NO” if requirement is for multi session and no graphics card required. • If HDX3D pro enabled then mandatorily NIVIDIA graphics drivers are to be installed else, while launching VDA grey screen appears because Linux by default search for graphics drivers
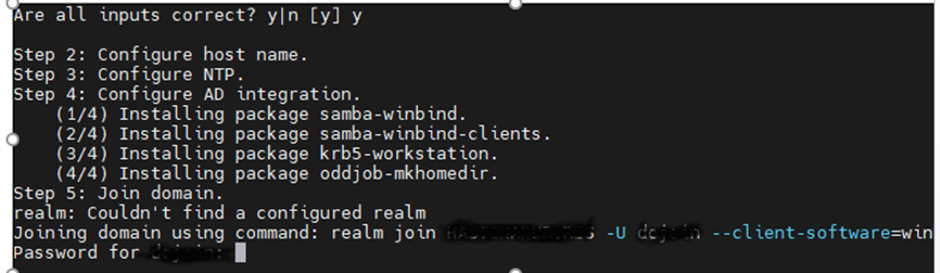
Cross verify the below Inputs before proceed further
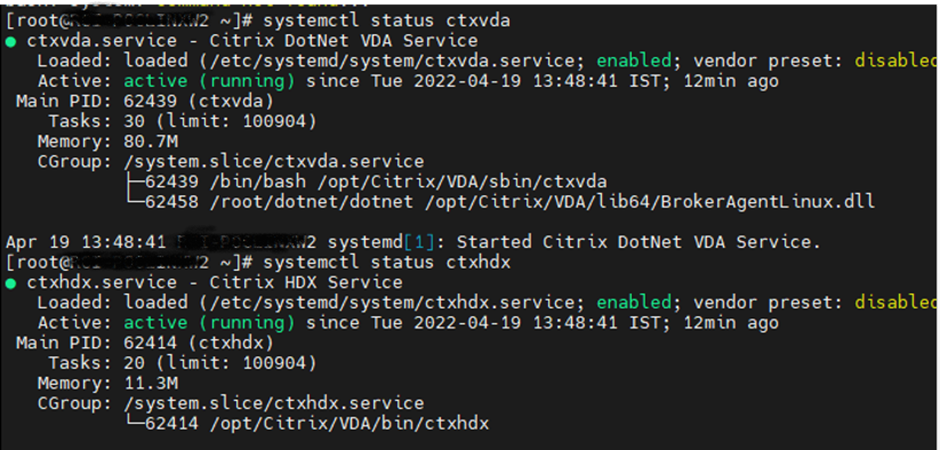
Post VDA Installation and configuration. Need to check the below 2 services status systemctl status ctxvda systemctl status ctxhdx
Follow below steps, if VDI has requirement to enable Graphics else ignore the steps
Prerequisite for NVIDIA Guest drivers installation: Assign GPU or vGPU to VM
Upload the NVIDIA drivers (highlighted) to /root folder
Note: Upload 2 NVIDIA guest drivers(highlighted above) into /root folder
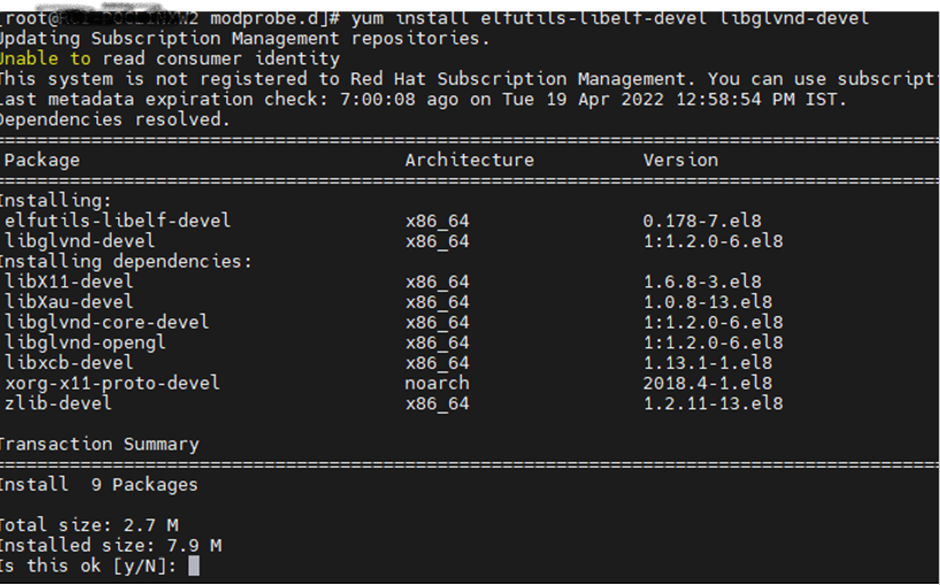
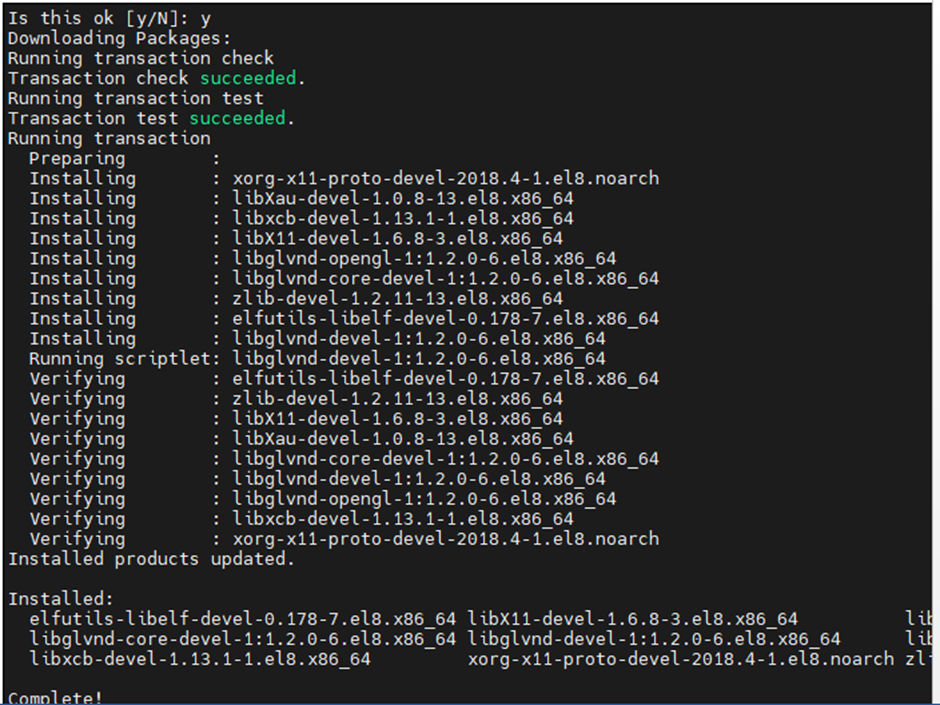
Install the below dependencies one by one before install of NVIDIA drivers yum install elfutils-libelf-devel libglvnd-devel yum install gcc yum install gcc kernel-devel yum install gcc kernel-headers
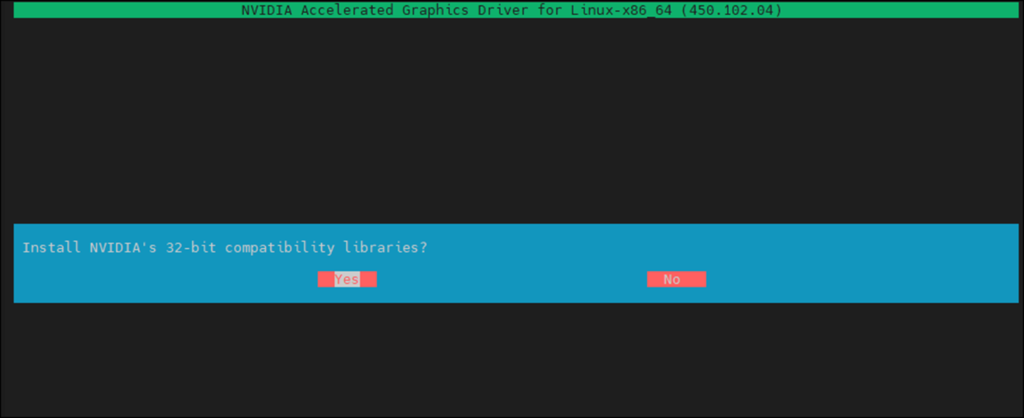
Once successfully installed. Install NVIDIA Package with below command
bash ./NVIDIA-Linux-x86_64-450.102.04-grid.run
Note: Without NVIDIA license server assignment, VDI functionality will be minimum hence map NVIDIA license server for complete functionality.
vGPU License Server Assignmenton Linux
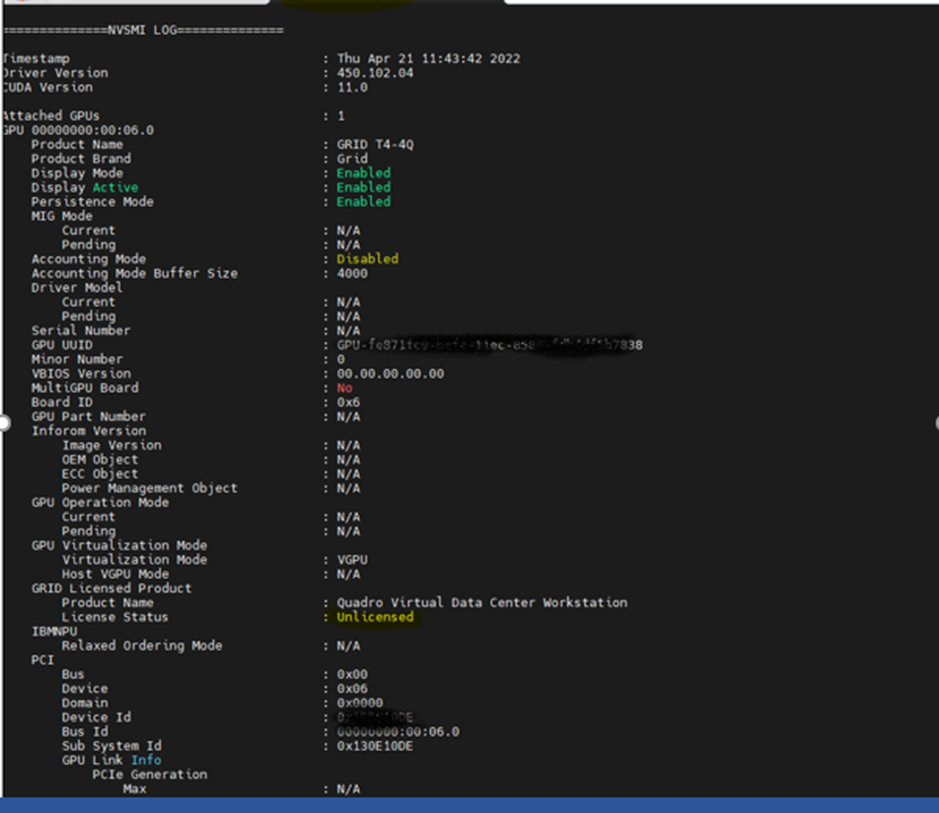
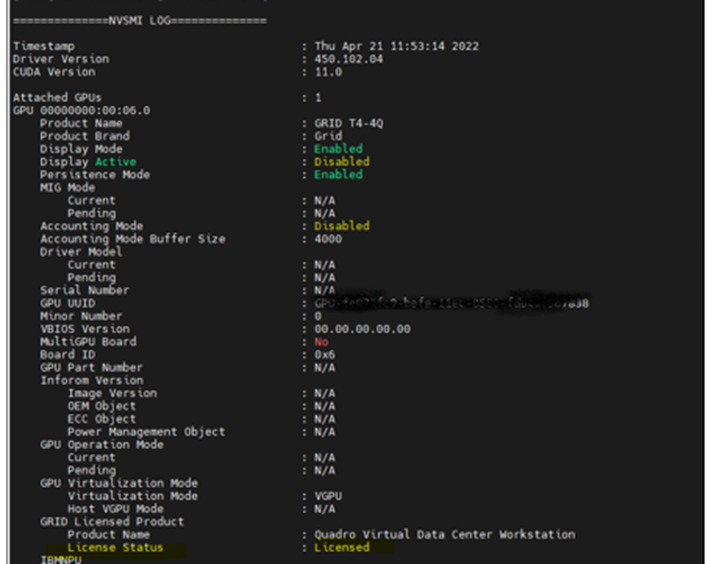
run below command to check license status
nvidia-smi –q
Ouptut before License server assignment
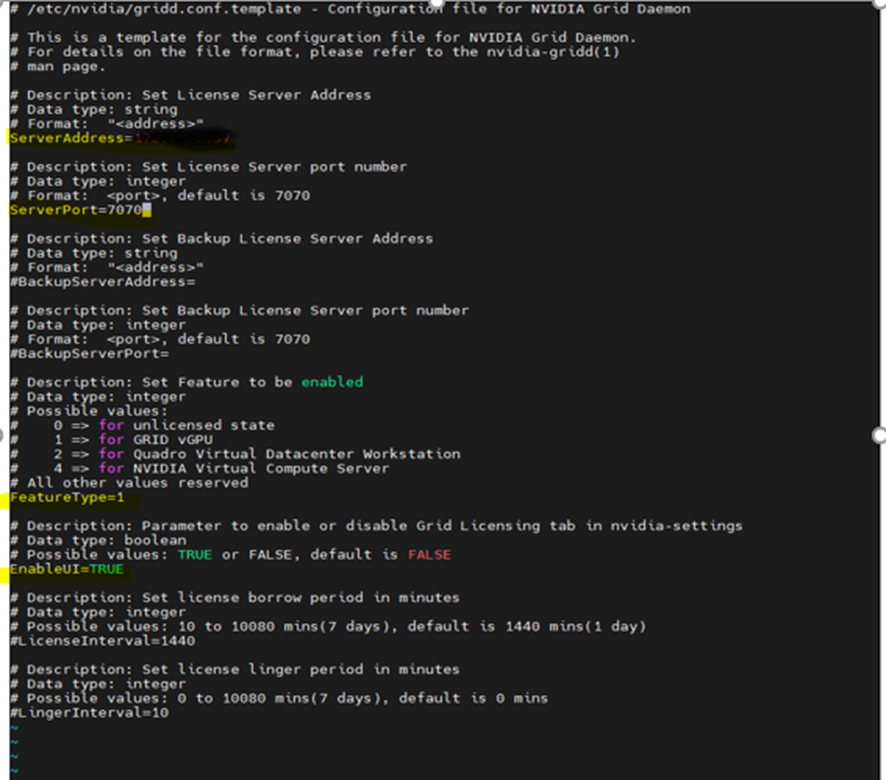
To provide NVIDIA License Server on Linux workstation, edit the file gridd.conf with below steps
cd /etc/nvidia/
Create new file “gridd.conf ” by using “gridd.conf.template” file cp gridd.conf.template gridd.conf
Edit the /etc/nvidia/gridd.conf by vi editor with below highlighted values
ServerAddress=IP Address ServerPort=7070 FeatureType=0 EnableUI=TRUE ( uncomment by removing #)
Stop & start nvidia service for license reflection
sudo nvidia-gridd stop sudo nvidia-gridd start
Run command nvidia-smi –q to check license status and verify logs /var/logs/messages If license not applied then restart VM.
Post License server assignment, you should get below output
Note: My use case is to create Machine Catalog with Unmanaged hence I created catalog and assigned VM’s directly to catalog. If your use case is to create Master Image and rollout VDI with MCS, follow below Citrix KB.