Azure Files offers fully managed file shares in the cloud that are accessible via the industry standard Server Message Block (SMB) protocol or Network File System (NFS) protocol. Azure Files file shares can be mounted concurrently by cloud or on-premises deployments. SMB Azure file shares are accessible from Windows, Linux, and macOS clients. NFS Azure Files shares are accessible from Linux or macOS clients. Additionally, SMB Azure file shares can be cached on Windows Servers with Azure File Sync for fast access near where the data is being used
Why would I use an Azure file share versus Azure Blob storage for my data?
Azure Files and Azure Blob storage both offer ways to store large amounts of data in the cloud, but they are useful for slightly different purposes. Azure Blob storage is useful for massive-scale, cloud-native applications that need to store unstructured data. To maximize performance and scale, Azure Blob storage is a simpler storage abstraction than a true file system. You can access Azure Blob storage only through REST-based client libraries (or directly through the REST-based protocol).
Azure Files is specifically a file system. Azure Files has all the file abstracts that you know and love from years of working with on-premises operating systems. Like Azure Blob storage, Azure Files offers a REST interface and REST-based client libraries. Unlike Azure Blob storage, Azure Files offers SMB or NFS access to Azure file shares. File shares can be mounted directly on Windows, Linux, or macOS, either on-premises or in cloud VMs, without writing any code or attaching any special drivers to the file system. You also can cache Azure SMB file shares on on-premises file servers by using Azure File Sync for quick access, close to where the data is used.
For a more in-depth description on the differences between Azure Files and Azure Blob storage, see Introduction to the core Azure Storage services. To learn more about Azure Blob storage, see Introduction to Blob storage.
Azure Files Connectivity options
We have some different connectivity options available to us depending on whether we’re accessing our file shares either internally or externally. In this context, accessing it internally or externally implies the Azure region where our storage account exists, where the file share exists.
• Internal connectivity: This implies that the clients accessing the file share are within the Azure cloud itself. Here we have the ability to use REST, SMB 2.1 and SMB 3.0.
• External connectivity: In this scenario, the client machines accessing the file shares are located in a different cloud environment or could also reside on premises. We only have the option of using REST and SMB 3.0 in this case because SMB 2.1 doesn’t provide the encryption which is required for connecting externally to ensure the safety of the data.
In terms of security, data encrypted at rest by default within our storage accounts and we have access to secure data transfer over HTTPS for data that is in transit. This allows us to protect our data, whether it’s at rest or in transit inside of our Azure Files.
Creating an Azure File Share Prerequisites
Create a storage account
Traditional AD environment synchronized to Azure AD with Azure AD Connect
Account credentials to perform the steps below to create a computer account in an existing Active Directory environment to connect with Azure Files.
Permissions to create the storage account
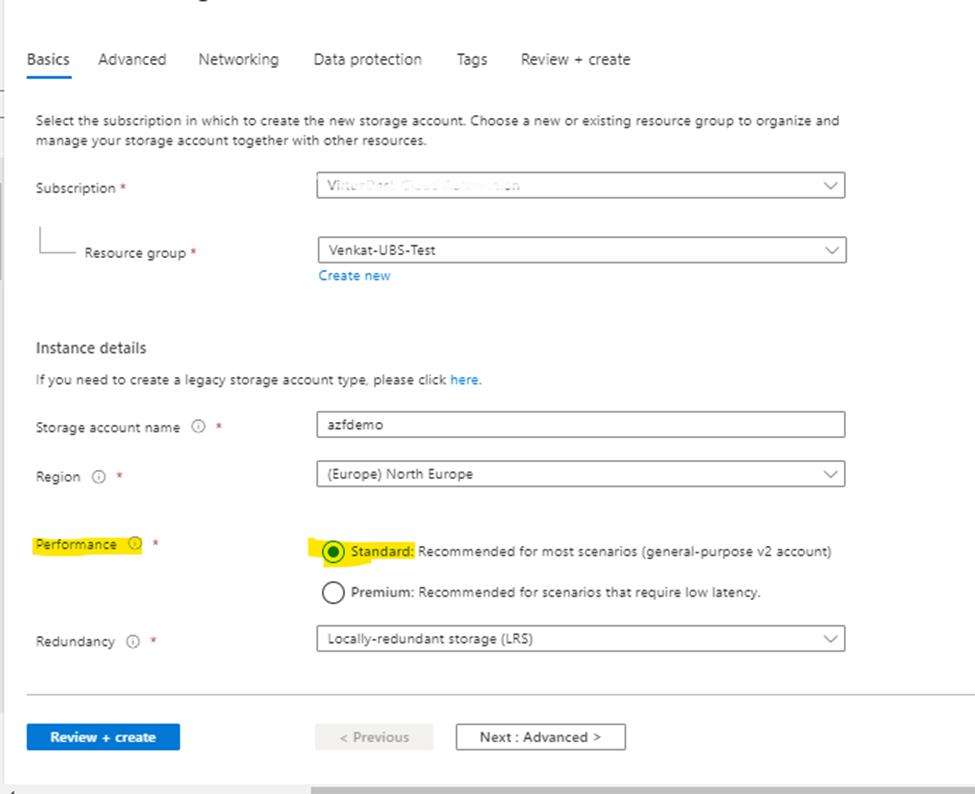
Before you can work with an Azure file share, you have to create an Azure storage account. A general-purpose v2 storage account provides access to all of the Azure Storage services: blobs, files, queues, and tables.
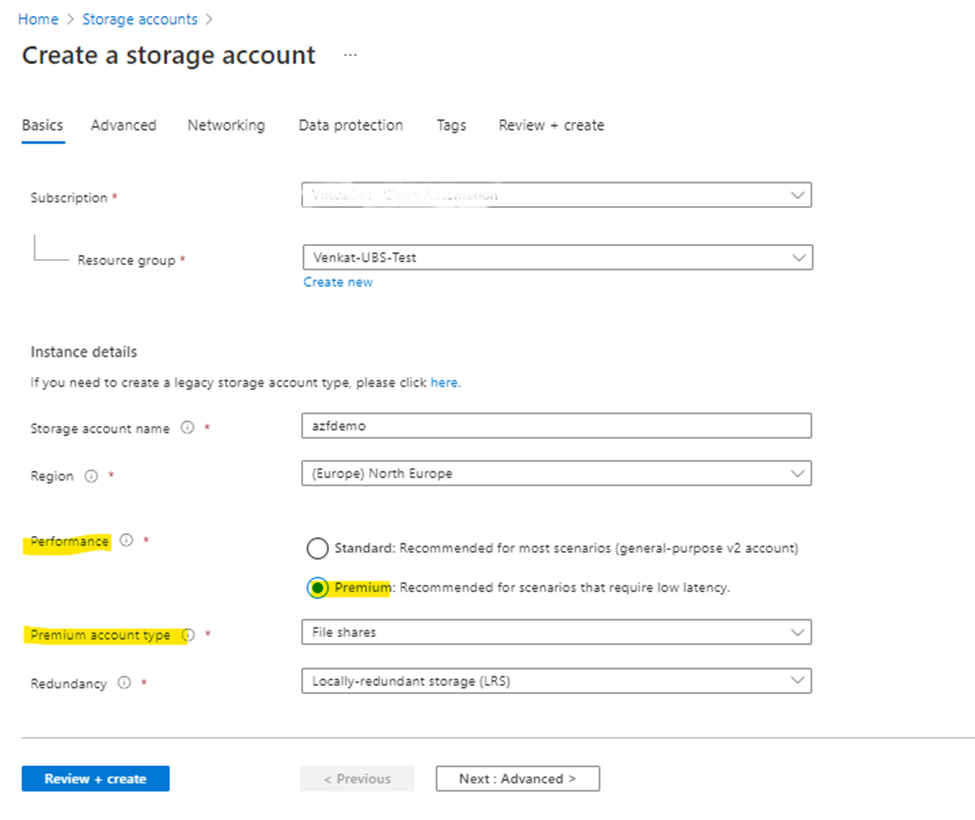
As I have a requirement for Premium, below screenshots are provided with Premium Type and note that options may vary based on selection of storage account type.
Storage Accounts ->Create New
In above screenshot, I selected Performance Type as “Standard”. In case, if you have a requirement for Premium file Type then options will be displayed as below
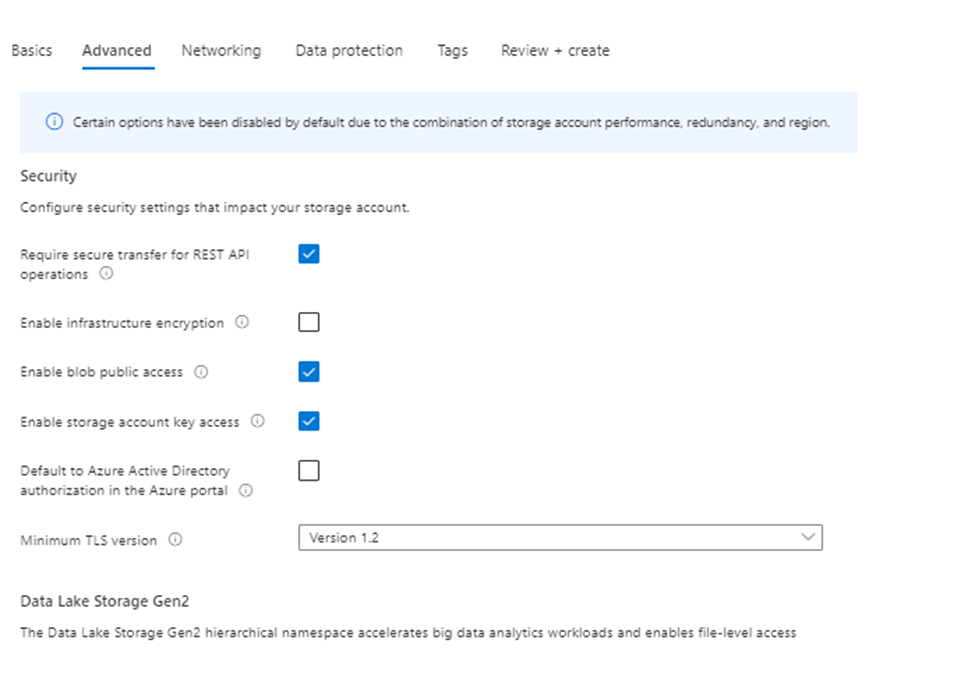
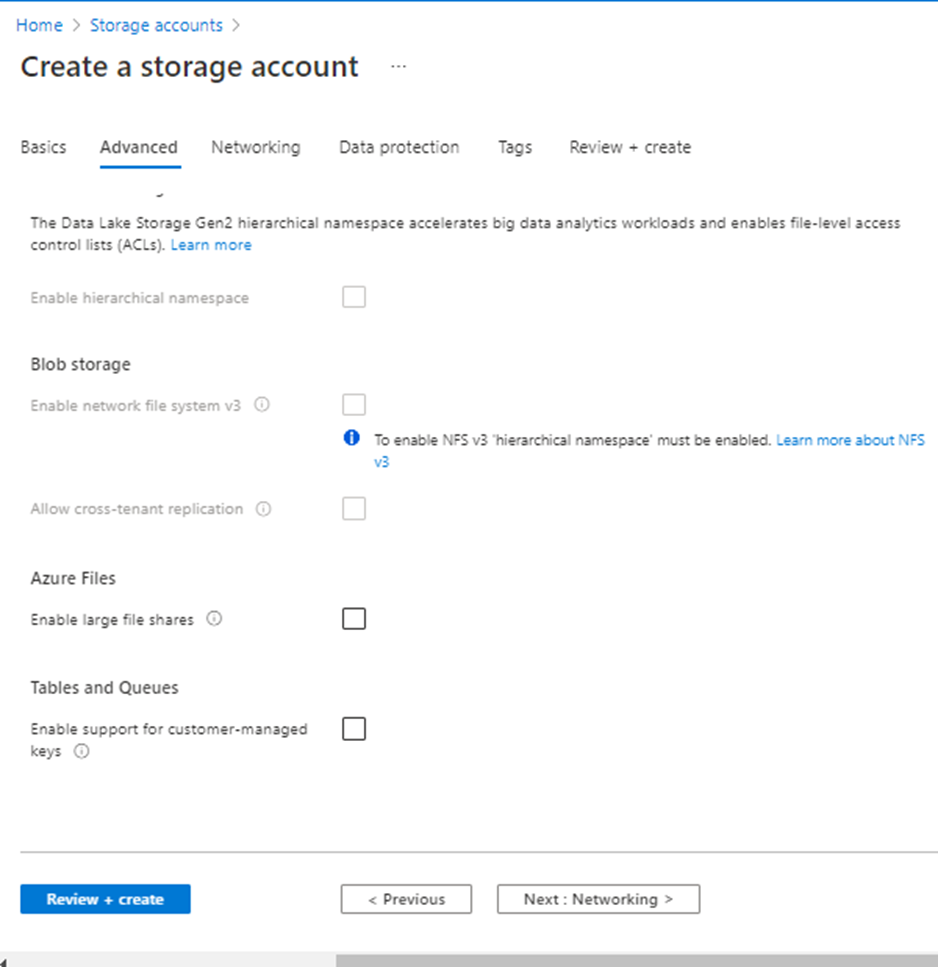
Click Next (Default options)
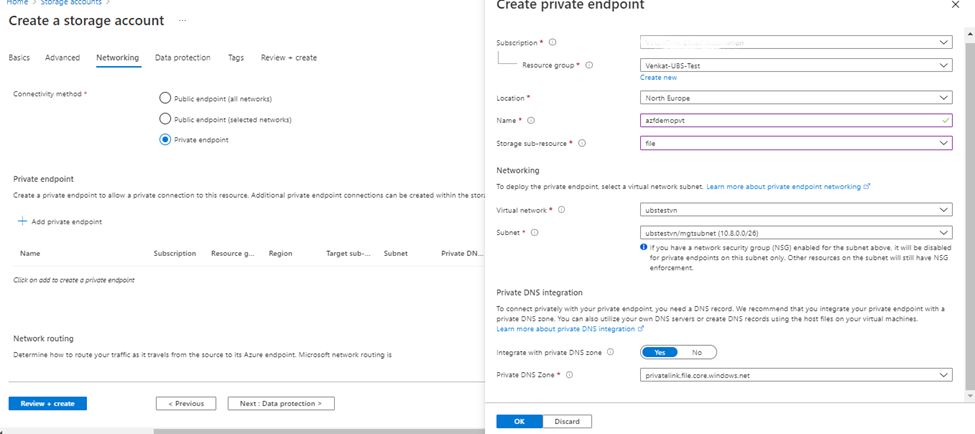
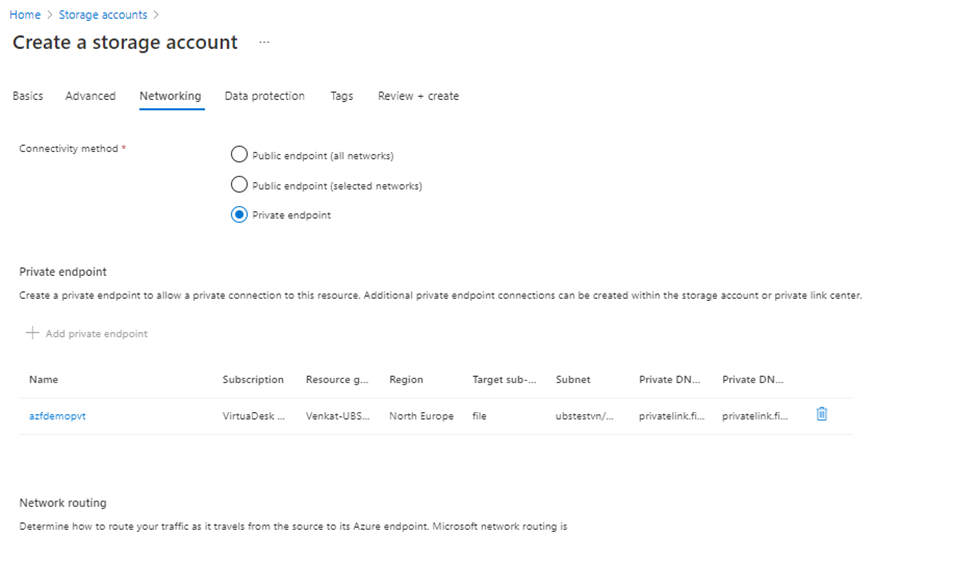
Under Networking ->Create Private Endpoint (best practice)
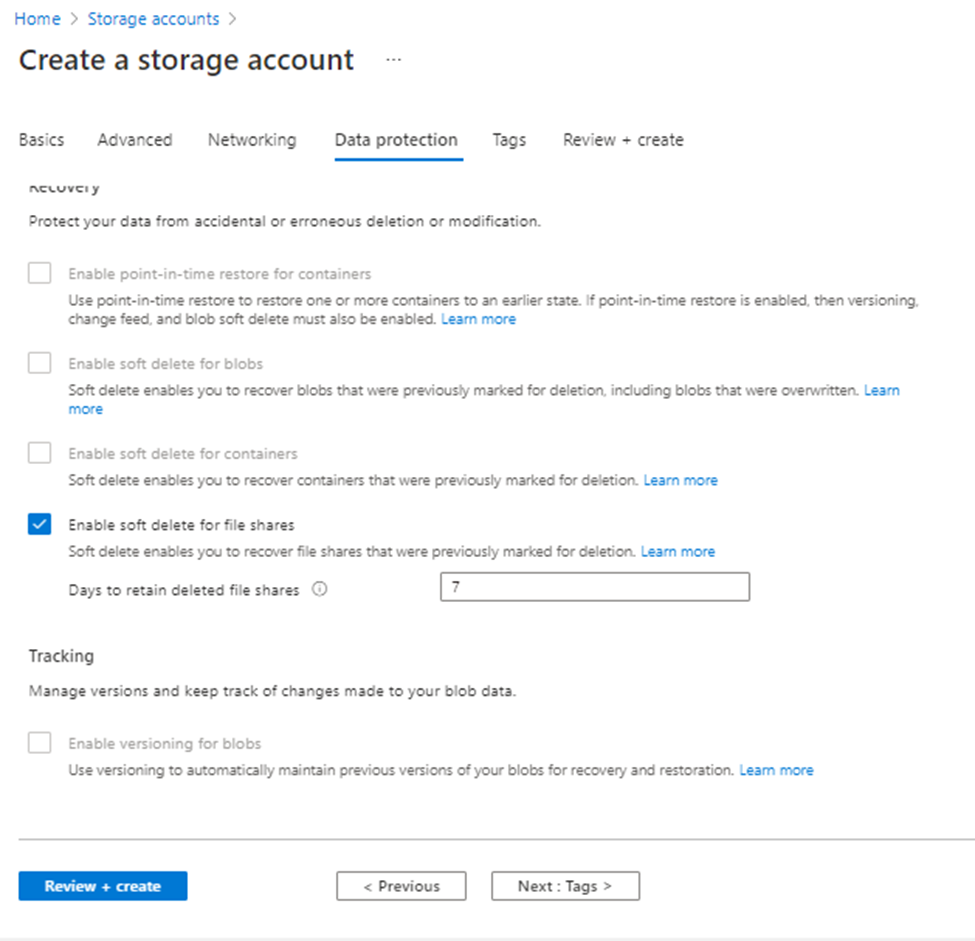
Click Next (Default Options)
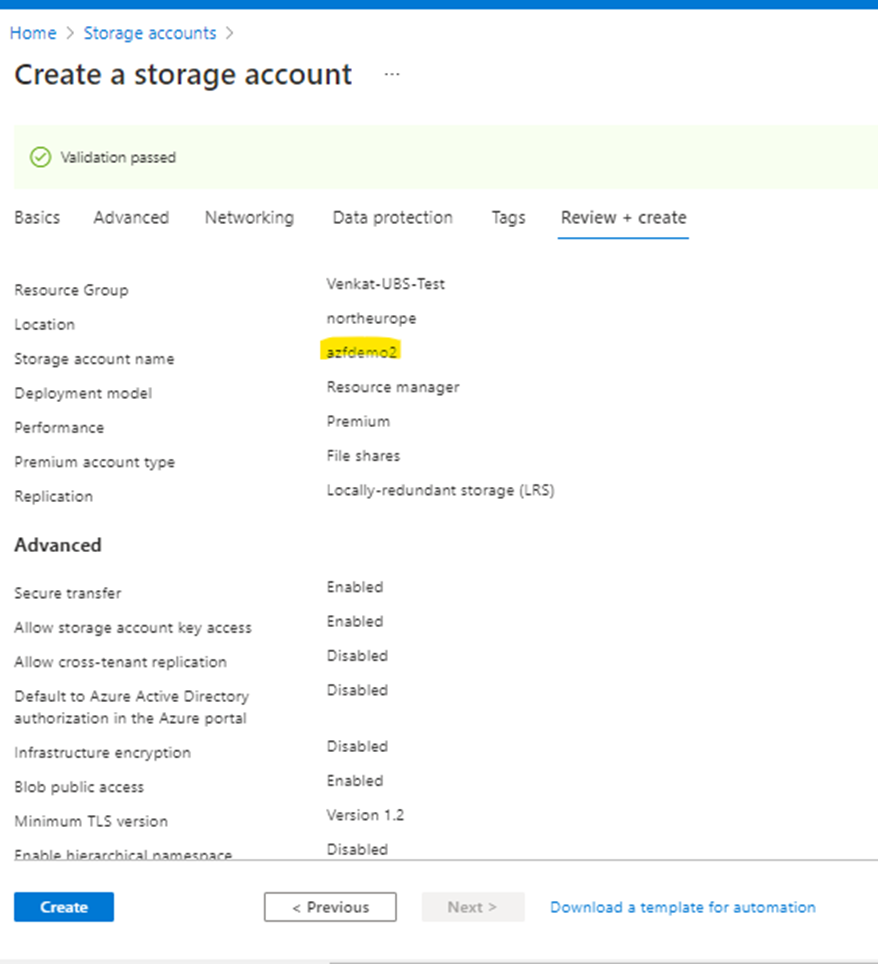
Click Next and validate to create
Enable AD DS authentication & Authorization for your Azure file shares -> Onpremises AD DS Authentication
Azure Files supports identity-based authentication over Server Message Block (SMB) through two types of Domain Services: on-premises Active Directory Domain Services (AD DS) and Azure Active Directory Domain Services (Azure AD DS). We strongly recommend you to review the How it works section to select the right domain service for authentication. The setup is different depending on the domain service you choose.
Supported scenarios and restrictions
• AD DS Identities used for Azure Files on-premises AD DS authentication must be synced to Azure AD. Password hash synchronization is optional. • Supports Azure file shares managed by Azure File Sync. • Supports Kerberos authentication with AD with RC4-HMAC and AES 256 encryption. AES 256 encryption support is currently limited to storage accounts with names <= 15 characters in length. AES 128 Kerberos encryption is not yet supported. • Supports single sign-on experience. • Only supported on clients running on OS versions newer than Windows 7 or Windows Server 2008 R2. • Only supported against the AD forest that the storage account is registered to. You can only access Azure file shares with the AD DS credentials from a single forest by default. If you need to access your Azure file share from a different forest, make sure that you have the proper forest trust configured, see the FAQ for details. • Does not support authentication against computer accounts created in AD DS. • Does not support authentication against Network File System (NFS) file shares.
When you enable AD DS for Azure file shares over SMB, your AD DS-joined machines can mount Azure file shares using your existing AD DS credentials. This capability can be enabled with an AD DS environment hosted either in on-prem machines or hosted in Azure.
Prerequisites Before you enable AD DS authentication for Azure file shares, make sure you have completed the following prerequisites:
• Select or create your AD DS environment and sync it to Azure AD with Azure AD Connect.
You can enable the feature on a new or existing on-premises AD DS environment. Identities used for access must be synced to Azure AD. The Azure AD tenant and the file share that you are accessing must be associated with the same subscription.
• Domain-join an on-premises machine or an Azure VM to on-premises AD DS. For information about how to domain-join, refer to Join a Computer to a Domain.
Part one: Enable AD DS authentication for your Azure file shares
Option 1 (recommended): Use AzFilesHybrid PowerShell module
1.1.1 Download AzFilesHybrid module
• If you don’t have .NET Framework 4.7.2 installed, install it now. It is required for the module to import successfully. • Download and unzip the AzFilesHybrid module (GA module: v0.2.0+) Note that AES 256 kerberos encryption is supported on v0.2.2 or above. If you have enabled the feature with a AzFilesHybrid version below v0.2.2 and want to update to support AES 256 Kerberos encryption, please refer to this article. • Install and execute the module in a device that is domain joined to on-premises AD DS with AD DS credentials that have permissions to create a service logon account or a computer account in the target AD. • Run the script using an on-premises AD DS credential that is synced to your Azure AD. The on-premises AD DS credential must have either Owner or Contributor Azure role on the storage account.
The Join-AzStorageAccountForAuth cmdlet performs the equivalent of an offline domain join on behalf of the specified storage account. The script uses the cmdlet to create a computer account in your AD domain. If for whatever reason you cannot use a computer account, you can alter the script to create a service logon account instead. If you choose to run the command manually, you should select the account best suited for your environment.
The AD DS account created by the cmdlet represents the storage account. If the AD DS account is created under an organizational unit (OU) that enforces password expiration, you must update the password before the maximum password age. Failing to update the account password before that date results in authentication failures when accessing Azure file shares. To learn how to update the password,
Execute below are the steps if Azure Powershell & Azure storage modules not available at client system where you are trying to execute the Join-AzStorageAccountForAuth PowerShell commands
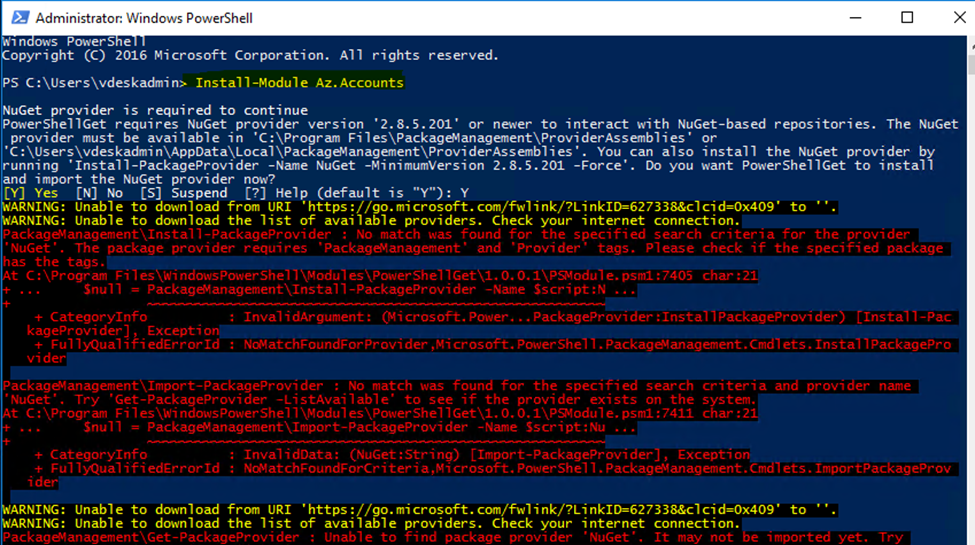
Install-Module Az.Accounts
The problem is that we are unable to install NuGet provider and a couple of errors are showing. Warning unable to download from URI, unable to download the list of available providers. After the errors, it did not install. In this article, you will learn why this is happening and the solution for installing NuGet provider for PowerShell.,
Follow below steps to resolve the above error
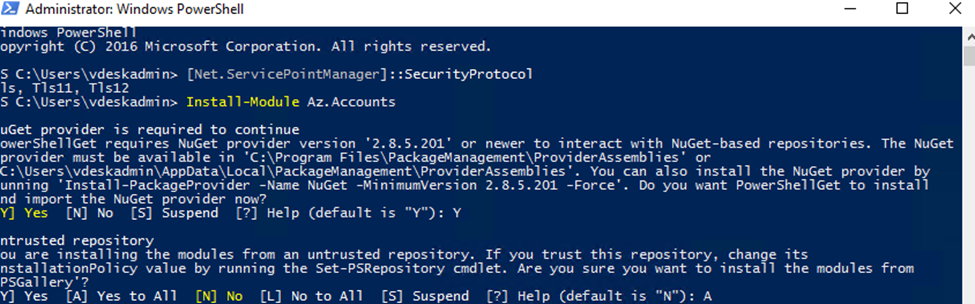
First, check the SSL version with below command
Solution for unable to install NuGet provider for PowerShell
Now that we gathered all the information, we are going to enable TLS 1.2 on the system. Run both cmdlets to set .NET Framework strong cryptography registry keys. After that, restart PowerShell and check if the security protocol TLS 1.2 is added
The first cmdlet is to set strong cryptography on 64 bit .Net Framework (version 4 and above).
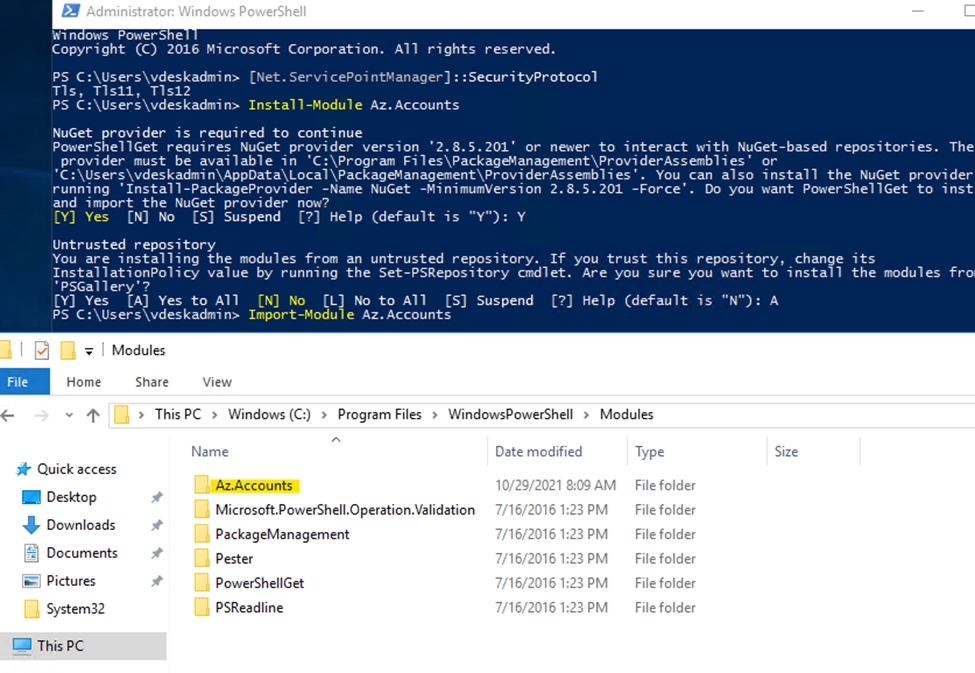
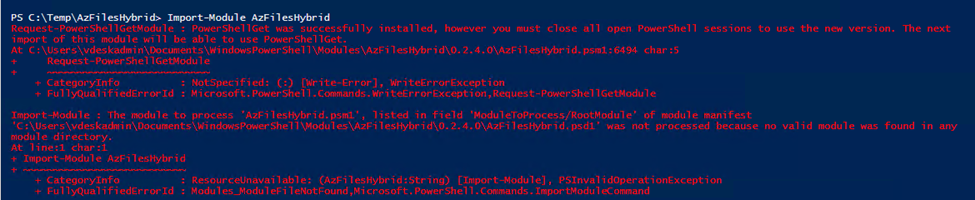
Steps: .\CopyToPSPath.ps1 Connect-AzAccount (Note: connect the Azure with required credentials ( i.e, account should have permission to access storage and create computer account in domain) Import-Module AzFilesHybrid
Note: Add OrganizationalUnitDistinguishedName if computer account need to join in specific OU
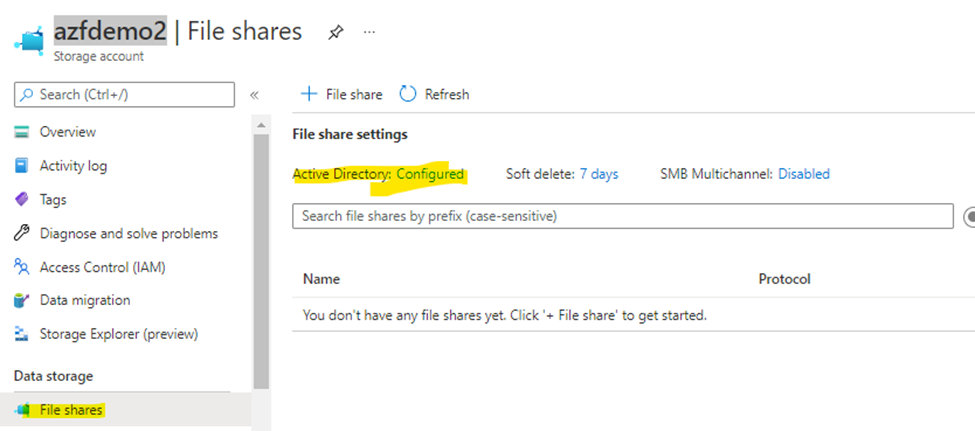
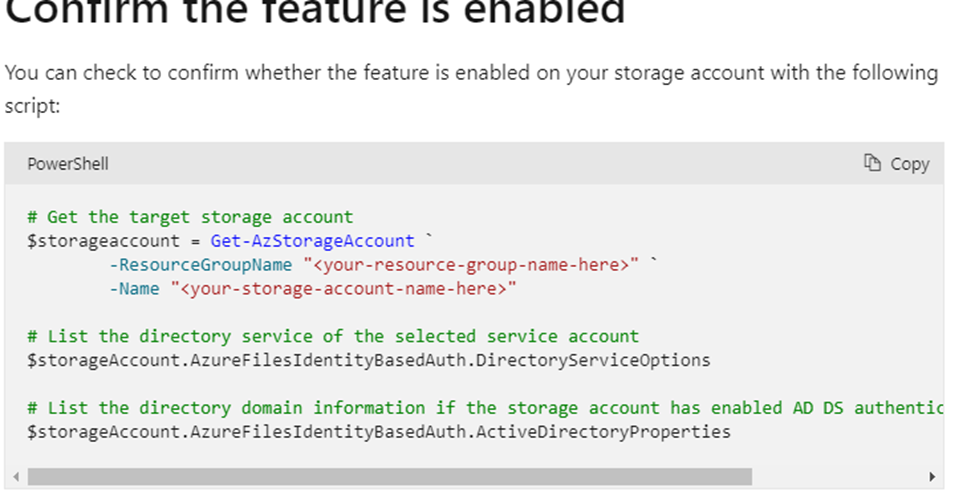
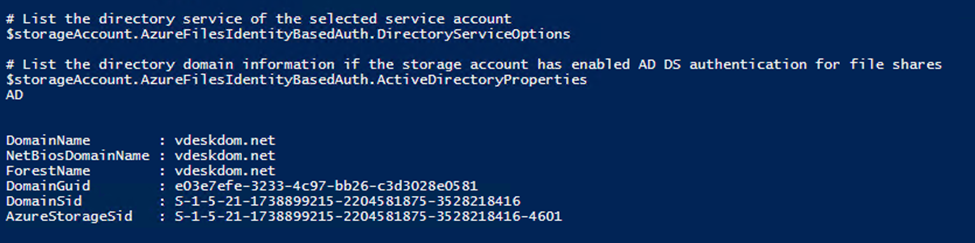
Post execution ->verify from below tools
Or through PowerShell
Note: Update the password of your storage account identity in AD DS
If you registered the Active Directory Domain Services (AD DS) identity/account that represents your storage account in an organizational unit or domain that enforces password expiration time, you must change the password before the maximum password age. Your organization may run automated cleanup scripts that delete accounts once their password expires. Because of this, if you do not change your password before it expires, your account could be deleted, which will cause you to lose access to your Azure file shares.
To trigger password rotation, you can run the Update-
Part 2: Assign share-level permissions to an identity
Once you’ve enabled Active Directory Domain Services (AD DS) authentication on your storage account, you must configure share-level permissions in order to get access to your file shares. There are two ways you can assign share-level permissions. You can assign them to specific Azure AD users/user groups and you can assign them to all authenticated identities as a default share level permission. Share-level permissions for specific Azure AD users or groups Share-level permissions must be assigned to the Azure AD identity representing the same user or group in your AD DS to support AD DS authentication to your Azure file share. Authentication and authorization against identities that only exist in Azure AD, such as Azure Managed Identities (MSIs), are not supported with AD DS authentication.
You can use the Azure portal, Azure PowerShell module, or Azure CLI to assign the built-in roles to the Azure AD identity of a user for granting share-level permissions.
Note: The share level permissions will take upto 3 hours to take effect once completed. Please wait for the permissions to sync before connecting to your file share using your credentials
Share-level permissions for all authenticated identities
You can add a default share-level permission on your storage account, instead of configuring share-level permissions for Azure AD users or groups. A default share-level permission assigned to your storage account applies to all file shares contained in the storage account. When you set a default share-level permission, all authenticated users and groups will have the same permission. Authenticated users or groups are identified as the identity can be authenticated against the on-premises AD DS the storage account is associated with. The default share level permission is set to None at initialization, implying that no access is allowed to files & directories in Azure file share.
Note: You cannot currently assign permissions to the storage account with the Azure portal. Use either the Azure PowerShell module or the Azure CLI, instead.
Mounting prerequisites Before you can mount the file share, make sure you’ve gone through the following pre-requisites:
• If you are mounting the file share from a client that has previously mounted the file share using your storage account key, make sure that you have disconnected the share, removed the persistent credentials of the storage account key, and are currently using AD DS credentials for authentication. For instructions to clear the mounted share with storage account key, refer to FAQ page. • Your client must have line of sight to your AD DS. If your machine or VM is out of the network managed by your AD DS, you will need to enable VPN to reach AD DS for authentication. Replace the placeholder values with your own values, then use the following command to mount the Azure file share. You always need to mount using the path shown below. Using CNAME for file mount is not supported for identity based authentication (AD DS or Azure AD DS).
Fully managed, Highly performing enterprise class File Storage Service and easy to integrate with Modern applications like analytics,HPC,AI/ML, VDI and mission critical application workloads
Fully managed File shares Only
Provides both NFS and SMB . NFS versions supportedNFs3,NFSv4, NFSv4.1. SMB versions supported v2.1, v3.0 and v3.1.1.
Primarily SMB, supports SMB 3.0 and above. Supports 2.1 but with lot of restrictions in terms of mounting and encryption of data.
Can be natively mounted to Linux machines
Linux distributions need to have SMB kernel client
SLA based tiering in terms of performance – Tiers are Standard, Premium and extreme
Tiering is storage media based with tier of Premium and standard.
Movement across ANF tiers can be done using Cloudsync. On the fly data in place tier changing in the Roadmap
Changing of tiers requires data to be migrated to the new tier using Data migration tools
Minimum deployment is 4TB and max is 100TB max ANF capacity is limited by Storage Account limitation of 500TB.
Minimum deployment min 100GB and maximum 100TB. For Standard files max is 5TB only
Max file size is 16TB
Max File Size is 1TB only
Performance depends on the selected SLA tier.
Max iops per share is 100K only.
Sub-quotas can be set.
No quota management, basically works and provisioned capacity level
Snapshots are highly space efficient , included in the price of ANF. Upto 256 snapshots per volume(Snap.0 to snap.255)
Snapshots are charged separately and are not space efficient. Snapshot charges $0.22 and $.0075 per used GB/month for Premium and Standard respectively
Data can be replicated using cross region replication ( azure marketing name for Snapmirror replication)
No Data replication options
CloudSync can be used in case of NAS or File server as the Source. Very fast and very cost effective and schedule based or one time run options available. CloudSync is free of Cost with ANF
Data Migration to Azure premium Files/files require a combination of Migration tools Filesync+AzureDatabox+Robocopy for Windows file server source and Robocopy only for NAS source. Robocopy inherently slow and manual monitoring is required.
Consistent sub milli sec latency
No latency consistency
Restoration can be easily done through snapshots. NetApp is a pioneer with snapshot technology and proven industry acceptance for more than 25 years.
No protection against accidental deletion ( Soft delete is in Preview as we speak and is not a mature technology in Azure)
Instant R/w Cloning with zero space occupancy until a unique write is made. Extremely useful in a devops and test dev environments.
No Cloning Capability.Snapshots are the only option available, however they are read only
Compliance and reporting included with ANF. Automated data privacy controls for GDPR, CCPA and many more. Free for ANF
Very good compliance template available. However reporting is not robust.