We had a requirement to migrated 8000+ Citrix User UPM profiles across globe to FSLogix Profiles (.VHDX) as customer wanted to move from Citrix to AVD. This was a very challenging requirement due to new experience
While volume activation is a process that many have utilized over the years, today’s post offers guidance to help you ensure that all your devices have been properly activated regardless of their connection to your organization’s network.
First, a refresher. Volume activation enables a wide range of Windows devices to receive a volume license and be activated automatically and en masse versus tediously entering an activation key on each Windows device manually.
The most common methods of volume activation require that devices to be connected to an organization’s network or connected via virtual private network (VPN) to “check in” from time to time with the organization’s activation service to maintain their licenses. When people work from home and off the corporate or school network; however, their devices’ ability to receive or maintain activation is limited.
Volume activation methods
There are several methods to activate devices via volume licensing. For detailed information, see Plan for volume activation. Here, however, is a summary for easy reference.
Key Management Service
Key Management Service (KMS) activation requires TCP/IP connectivity to, and accessibility from, an organization’s private network so that licenses are not accessible to anyone outside of the organization. By default, KMS hosts and clients use DNS to publish and find the KMS key. Default settings can be used, which require little or no administrative action, or KMS hosts and client computers can be manually configured based on network configuration and security requirements.
KMS activations are valid for 180 days (the activation validity interval). KMS client computers must renew their activation by connecting to the KMS host at least once every 180 days. By default, KMS client computers attempt to renew their activation every 7 days. If KMS activation fails, the client computer retries to reach the host every two hours. After a client computer’s activation is renewed, the activation validity interval begins again.
Multiple Activation Key
A Multiple Activation Key (MAK) is used for one-time activation with Microsoft’s hosted activation services. Each MAK has a predetermined number of activations allowed. This number is based on volume licensing agreements, and it might not match the organization’s exact license count. Each activation that uses a MAK with the Microsoft-hosted activation service counts toward the activation limit.
You can use a MAK for individual computers or with an image that can be duplicated or installed using Microsoft deployment solutions. You can also use a MAK on a computer that was originally configured to use KMS activation, which is useful for moving a computer off the core network to a disconnected environment.
Active Directory-based activation
Active Directory-based activation is similar to KMS activation but uses Active Directory instead of a separate service. Active Directory-based activation is implemented as a role service that relies on Active Directory Domain Services to store activation objects. Active Directory-based activation requires that the forest schema be updated using adprep.exe on a supported server operating system, but after the schema is updated, older domain controllers can still activate clients.
Devices activated via Active Directory maintain their activated state for up to 180 days after the last contact with the domain. Devices periodically attempt to reactivate (every seven days by default) before the end of that period and, again, at the end of the 180 days.
Windows 10 Subscription Activation
Starting with Windows 10, version 1703 Windows 10 Pro supports the Subscription Activation feature, enabling users to “step-up” from Windows 10 Pro to Windows 10 Enterprise automatically if they are subscribed to Windows 10 Enterprise E3 or E5.
With Windows 10, version 1903 the Subscription Activation feature also supports the ability to step-up from Windows 10 Pro Education to the Enterprise grade edition for educational institutions – Windows 10 Education.
The Subscription Activation feature eliminates the need to manually deploy Windows 10 Enterprise or Education images on each target device, then later standing up on-prem key management services such as KMS or MAK based activation, entering GVLKs, and subsequently rebooting client devices.
To step a device up to Windows 10 Education via Subscription Activation the device must meet the following requirements:
Windows 10 Pro Education, version 1903 or later installed on the devices to be upgraded.
A device with a Windows 10 Pro Education digital license. You can confirm this information in Settings > Update & Security > Activation.
The Education tenant must have an active subscription to Microsoft 365 with a Windows 10 Enterprise license or a Windows 10 Enterprise or Education subscription.
Devices must be Azure AD-joined or Hybrid Azure AD joined. Workgroup-joined or Azure AD registered devices are not supported.
Note: If Windows 10 Pro is converted to Windows 10 Pro Education using benefits available in Store for Education, then the feature will not work. You will need to re-image the device using a Windows 10 Pro Education edition.
Volume activation while working from home
If you activate devices in your organization using MAK, the activation process is straightforward and the devices are permanently activated. If you are using KMS or Active Directory-based Activation, each device must connect to the organization’s local network at least once every 180 days to “check in” with either the KMS host or the Active Directory domain controller. Otherwise, the user will be warned to activate Windows again.
With many users working or taking classes from home, a connection to the organization’s network may not exist, which would ultimately leave their devices in a deactivated state. There are a few options to avoid this:
Use a VPN. By having the device connect to your organization’s network via a VPN, it will be able to contact a KMS host or Active Directory domain controller and will be able to maintain its activation status. If you manage your devices through a wholly on-premises solution to deploy policies, collect inventory, and deploy updates and other software, there is a good chance you are already using a VPN. Depending on the VPN configuration, some manual configuration of the client device may be required to ensure the KMS service is accessible through the VPN. For more details on these settings, which can be implemented via script, see Slmgr.vbs options for obtaining volume activation information.
Convert the devices from KMS to MAK activation. By converting from KMS to MAK activation, you replace the license that requires reactivation every 180 days with a permanent one, which requires no additional check-in process. There are some cases—in educational organizations, for example—where each device is re-imaged at the end of the school year to get ready for the next class. In this case, the license must be “reclaimed” by contacting your Microsoft licensing rep or a Microsoft Licensing Activation Center.
One way of converting a device from KMS to MAK activation is to use the Windows Configuration Designer app (available from the Microsoft Store) to create a provisioning package, which includes the MAK, and deploy the package through email or a management solution such as Microsoft Intune.
You can also deploy a MAK directly within Intune without creating a provisioning package by creating a simple PowerShell script with the following commands and deploying the script to a user group:
slmgr.vbs /ipk XXXXX-XXXXX-XXXXX-XXXXX-XXXXX slmgr.vbs /ato (In the example above, XXXXX-XXXXX-XXXXX-XXXXX-XXXXX is your MAK key.)
It is important to monitor the success of these activations and remove users from the target group once their devices have been activated so that their other devices do not receive a new license.
Use Subscription Activation. This requires the devices to be joined to your Azure AD domain, enabling activation in the cloud. This is possible if you have one of the following subscriptions:
Windows 10 Enterprise E3/E5
Windows 10 Education A3/A5
Windows 10 Enterprise with Software Assurance
Microsoft 365 E3/E5
Microsoft 365 E3/A5
Microsoft 365 F1/F3
Microsoft 365 Business Premium
If you need assistance and have one of the preceding subscriptions with at least 150 licenses, you may be eligible for assistance through FastTrack. Contact your Microsoft representative or request assistance from FastTrack and a Microsoft FastTrack representative will contact you directly.
Conclusion
Windows volume activation has been around for a long time, but the increased number of users working from home may require your organization to re-evaluate how to best keep your devices activated if they cannot reach your on-premises activation service if you are using KMS or Active Directory-based Activation. It is important to consider the options available to you to ensure your devices stay activated. As always, there is no “one-size-fits-all” approach, so consider the pros and cons of each option as you plan on how to best support your remote workers and students.
Local Host Cache was a core feature of the Independent Management Architecture (IMA) that was introduced with Citrix Metaframe XP 1.0 in 2001, and was still used until Citrix XenApp 6.5 and now reintroduced in XenApp/Desktop 7.12
Technically, the LHC is a simple Access database where it stores a subset of the data store in each Presentation (XenApp) server. The IMA service running on each Presentation(XenApp) Server downloads the information for every 30 mins or whenever a configuration change is made in farm.
LHC primary functions are permits a server to function in the absence of a connection to the data store & improves performance by caching information of applications.
LHC contain the information of servers, published applications, Domain & Licensing. LHC evolved a lot over the years and allowed SQL downtimes for an indefinite period in its last release with XenApp 6.5.
If the data store is unreachable, the LHC contains enough information about the farm to allow normal operations for an indefinite period, if necessary. However, no new static information can be published, or added to the farm, until the farm data store is reachable and operational again.
The disappearance of LHC
With the release of the awful version 7.0 of XenApp in 2013 and the move to XenDesktop FlexCast Management Architecture (FMA), Citrix decided to remove the Local Host Cache feature–and many others–without offering any other alternative. To be fair, Citrix converged XenApp into XenDesktop, which was already using the FMA design since the version 5 and without Local Cache Host equivalent. This decision immediately made the SQL infrastructure a critical piece of any XenApp implementation. Any downtime on the SQL infrastructure would immediately cause a downtime for new sessions on the XenApp infrastructure as well. It could also have some side effects with the old Citrix Web Interface.
Citrix recommends having a highly available SQL infrastructure to host XenApp and XenDesktop databases. While you can successfully implement HA for your SQL infrastructure, it does not necessarily mean that you will avoid downtimes, as many components are to be considered.
The pseudo rebirth of LHC with Connection Leasing (CL)
Facing a storm of complaints, Citrix also started–finally!–to listen to its customers and released XenDesktop 7.6 in Sept 2014 with the Connection Leasing (CL) feature enabled by default.
Unfortunately, CL was not full replacement of LHC and it is alternative option provided in placement of LHC, limited to frequently used and assigned applications/desktops (up to 2 weeks by default). For users not using Citrix frequently or using pooled desktops, CL is completely useless and did not resolve anything. There are also many limitations: load management, workspace control, power actions are not supported.
The reintroduction of LHC
Citrix came up with a milestone achievement with its new idea as part of the XenDesktop 7.12 release in Dec 2016. This time, they claimed to bring back all the Local Host Cache (LHC) features from XenApp 6.5, even adding few improvements to make it more reliable. LHC feature is offered for Cloud and On Premises implementations along Connection Leasing in 7.12, but is considered the primary mechanism to allow connection-brokering operations when database connectivity to the site database is disrupted. Surprisingly, Local Host Cache feature is disabled by default. Let us expect Citrix to enable that feature by default in the next version.
When installing XenDesktop 7.12 and up, a SQL Express instance(Local DB) will be installed locally on each Delivery Controller to store the Local Host Cache. Config Synchronizer Service (CSS) takes care of the synchronization between the remote database and the Local Host Cache (Local DB). The Secondary Brokering Service (Citrix High Availability Service) takes over from the Principal Broker when an outage is detected and does all registration and brokering operations.
There are many limitations to consider with this version of LHC
Local DB, which is a runtime version of SQL Server with a specific licensing that limits the usage of four cores.
No support for Pooled desktops, which is a huge downside.
No change can be made to the farm (assignments, publications, power actions, etc.), you cannot even open the consoles (Director & Studio) and PowerShell
No control over the LHC election process and only a single Delivery Controller will take care of all VDA registrations and broker sessions for the whole zone during an outage which limits 5,000 VDAs per zone (not enforced)
Most importantly, it is only a one-way communication between the LHC and the remote SQL database
New version of the Local Host Cache would not assure you zero downtime. There is also a delay before users can actually connect .When the remote database goes down, VDAs still have to re-register to the newly and ONLY elected Delivered Controller. It can result in users not having icons in StoreFront or users not able to start new sessions for a short period.
In conclusion, it took Citrix almost 4 years to deliver a somewhat equivalent of the good old Local Host Cache for XenDesktop 7.x. The database is not a single point of failure anymore in a XenDesktop/XenApp deployment. However, customers with large deployments are not supported with this version of the Local Host Cache and some of the -HUGE- limitations can discourage you from using that feature
PVS stream service abrupt termination intermittently (approx. once in month) which causing user sessions freeze and user unable to launch HSD’s.
Environment :
2 Citrix PVS Servers (VM’s) with version 7.6
2000-3000 concurrent Users
86 HSD’s & 6 Golden Images
Microsoft Hypervisor 2012R2 ( 15 Node) – CICSO UCS
Observations:
Issue occurring once or twice in a month and there is no common pattern in days or hours,issue recurring in both PVS servers at a time
No changes in environment
Onsite engineer informed that issue existed since 3 months and issue getting resolved post restart of PVS servers.
One day, same issue repeated but issue not sorted out post restarting of PVS servers -> Issue escalated to support team (Me)
Observed Event Id 11 :”Detected one or more hung threads , DbAccess error: <Record was not found> <-31754> (in ServerStatusSetDeviceCount() called from SSProtocolLogin.cpp:2903” -> Indicates “Thread hangs under the stream service” & DB Access errors
Observed multiple vDisk retries on the problematic target devices. 11 at boot time and approximately 611 per hour during session
Observed recommended MacAfee exclusions are not in place -> Stopped MacAfee service and restarted PVS server -> PVS Streaming service stable for some time on one PVS server and again terminated ->Due to time constraint, logged a call with vendor(Citrix).
After 2 hrs, Citrix support joined the call and started collecting CDF races and procdump collection for the terminating stream service
After few hours , issue resolved automatically and Citrix support unable to find root cause with collected logs
In 2 months , issue repeated 2 times and customer frustrated as root cause was not found for abrupt streaming service termination intermittently.
Support Team (Myself) analyzed the environment and observed the Cache mode is configured as “ Cache on Server” which is not recommended for Production environment , Best practice to use “Cache on RAM overflow to HDD” which is a best practice to reduce load on PVS server & optimal performance ->Taken the same observation Citrix support and requested their observations
Explained to customer that missing of best practices will lead to these type of intermittent issues , since there is no root cause found and it is not a best practice to keep cache on server in production environment , prepared a plan to change cache configuration to” Cache on RAM overflow to HDD”.
Current PVS Storage configuration for cache as below
PVS1 (VM)->1700 GB allocated through Virtual HBA ( Total golden Image Sizes is 440 Gb & Remaining for Write Cache)
PVS2 (VM) -> 1700 GB allocated through Virtual HBA ( Total golden Image Sizes is 440 Gb & Remaining for Write Cache)
Proposed Storage change Configuration as below:
Post referring multiple blogs, Write Cache proposed to all images(profiles) is 20 GB -> Therefore , for 86 HSD, 1820 GB required and it should present to complete Hyper-v cluster as HSD hosted on cluster.
1820 GB -> To allocate Hyper-v Cluster ( To Create 20 GB Write Cache for each VM)
New LUN of 800 GB to PVS 1 (VM) -> To store Golden Images ( Taken new LUN for easy migration from old LUN and extra space taken for future requirement)
New LUN of 800 GB to PVS 2 (VM) -> To store Golden Images ( Taken new LUN for easy migration from old LUN and extra space taken for future requirement)
Post Cache change and migration, planned to release old LUNs’ ( 1700 & 1700 ) to storage team
How to change Cache Mode for existing production Vdisk:
Get new storage drive as explained above and assign the same drive letter in PVS 1 & PVS2 as it is under Load Balance.
Log into PVS Server 1 ( Initially do only changes in one PVS server).
Copy the Golden Image(.VHD & PVP files) to new drive.
Defragment the vdisk by right clicking the VHD and Mount -> This step is doing as per best practice to achieve optimal performance.
Create New Store in PVS Server and map the path to New drive.
Import the VdIsk to New Store.
Change vdisk to “Private Mode”.
Create new device or change existing device (To boot vdisk in Private Image mode).
Go to Device Properties in device collection, change the vdisk path ( to newly imported vdisk) ->Make sure to change the boot from Network to vdisk.
Go to VM Settings ->Remove IDE Controller-> DVD Drive ( As Write cache drive need to map as “D drive”).
Under IDE Controller -> Create one HDD 20 GB with Fixed drive to assign to HSD (To Write Cache drive to VM ).
Power on & Login to VM , format the drive with MBR ->Assign the drive letter “D” drive (Give Volume name as “Write Cache” & make sure your vdisk in Private mode by accessing vdisk tray icon).
Restart VM.
As an optional , it is best practice to redirect the Page File to Write Cache Drive ( Page File planned to keep as 4 GB post referring few blogs).
Post restart of VM, Go to Page files settings and configure page file(4GB) only to “D drive”.
Go to PVS Server -> vdisk pool -> Change the vdisk from Private to Standard (Note: Cache options will visible only in Standard Image Mode).
Change Vdisk Cache to “Cache on RAM with overflow to HDD” and assign 4 GB RAM in cache ( 4 GB cache is decided post referring few blogs).
Again boot HSD and observe the Cache status (It will be visible as Cache on RAM overflow to HDD and vdisk as Read-only).
Assign this vdisk to any Test VM(device) and ask users to test.
If Image is fine then shut down the devices attached to vdisk -> And copy VHD & PVP (Don’t copy LOK files) to second PVS server -> Make sure replication should be green
To replicate to other devices(VM’s)
Follow same steps 11th to 15th for rest of the VM’s.
Reboot HSD.
Test the HSD accessibility & Cache configuration.
Conclusions
Since exact root cause was not found, vendor provided & self-analyzed would be the cause for abrupt streaming service termination
When each Target Device boots up the OS is not aware of the Write Cache and writes to the logical disk that it is presented (the vDisk). The PVS driver then redirects this data at the block level to the write cache which in your environment is held on the PVS server. When BNIStack driver ( transport stack for communicating with the PVS server) is then initialized, it will pull down chunks of the vDisk as and when they are needed from your vDisk store which is on your PVS server also. The BNIStack driver will also access the write cache directly when it needs to issue additional writes from the target device. The communication in relation to the above is carried out between the BNIStack driver on the target device and the Stream Service on the PVS server. The case notes state that environment have approximately 2000 users which I suspect is putting a large overhead on the Stream Service responsible for servicing all Write Cache requests.
The Target Device BNIStack driver is also responsible for retries (because UDP does not). The base timeout for a packet timeout is 10 seconds. If the server responds quickly, this value is reduced by half all the way down to 1 second. Correspondingly, if the server responds slowly the timeout will double all the way up to 10 seconds.
A retry timeout of 1 second or less may cause excessive I/O retries, leading to slow response and hanging of target devices which will then ultimately lead to a stream service failure. Since we know we are seeing issues with the stream service and subsequent hanging/crashing of this service and considering we are aware of the large write cache overheads incurred on the stream service already, I suspect that the load we are putting on the stream service is too great, culminating in it grinding to a halt, this will then present itself with the symptoms we see at the target device e.g. slow logging in, sluggishness inside the session.
As explained above, the recommendation to mitigate this is to move the Write Cache away from the PVS Server itself and place the processing overhead at the target device instead.
Recommendations & Reference
We have been observing the environment for about 2 months now and the issue has not occurred since we had disabled the antivirus services.
As a best practice, upgrade all environmental components (servers and target device software) to a required level, either PVS 7.6 LTSR CU3 OR PVS CR 7.13.
FYI: The recommendation for desktop operating systems start with 256-512MB and for server operating systems start with 2-4GB.
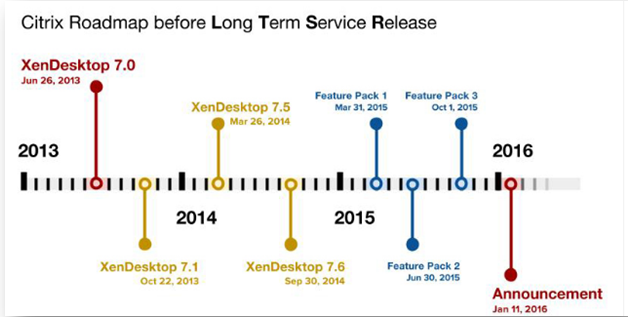
Citrix provides servicing options to give greater flexibility and choice in how to adopt new XenApp, XenDesktop, and XenServer functionality while giving greater predictability for maintaining and managing the support of your environment
Last year, Citrix introduced two new XenApp / XenDesktop servicing options, the LTSR, which stands for Long Term Service Release and the CR a.k.a. Current Release., In 2016, Citrix announced first LTSR of XenApp and XenDesktop 7.6 and in 2017 first LTSR for XenServer 7.1 that is available for download on Citrix.com.
What is LTSR?
As a benefit of Software Maintenance, Long Term Service Releases (LTSR) of XenApp ,XenDesktop,XenServer enable enterprises to retain a particular release for an extended period of time while receiving minor updates that provide fixes, typically void of new functionality. Long Term Service Releases (LTSR) is ideal for large enterprise production environments where you would prefer to retain the same base version for an extended period
A Long Term Service Release guarantees 5 years of mainstream support and an optional 5 years of extended support (needs to purchased separately). This includes cumulative updates every 4 to 6 months, a new LTSR version of XenApp / XenDesktop every 12 to 24 months and any potential (hot) fixes
A valid Software Maintenance (SM) contract is needed to make use of the LTSR or CR servicing option.
Ideal customer environment for a LTSR is for the customers who typically follow a 3-5 year version upgrade cycle
Long Term Service Releases will have a regular cadence of Cumulative Updates that will typically contain only fixes
What is Current Release?
Any new release of XenApp/XenDesktop/XenServer will be labeled a Current Release. With the CR servicing option you can always make use of (install) the most recent XenApp and/or XenDesktop versions including all the latest enhancements and additions that come with it.
Its release cycles are much shorter with a new version release being announced every three to nine months in general.
Citrix recommends that large enterprise customers have a combination of Current Release and Long Term Service Release environments.
Switching from a LTSR to a CR servicing, and vice versa, is always optional as well
All initial releases of XenApp/XenDesktop/XenServer will be a Current Release. There will likely be multiple Current Releases of a major XenApp/XenDesktop/XenServer version (i.e. 7.6, 7.6 FP1, 7.6 FP2, 7.6 FP3, 7.7, 7.8 ,7.9,7.11,7.13,7.14); however, there will likely only be one LTSR release of that version after that release is considered customer-tested and industry-proven (i.e. 7.6 FP3).
How will the customer know if their environment is Long Term Service Release compliant?
Citrix support and engineering have developed the LTSR Assistant tool which will scan your environment and compare your environment with the necessary LTSR components to determine if you are compliant. The tool provides a report that will outline the necessary updates to achieve compliance. The LTSR Assistant tool is available for download athttp://support.citrix.com/article/CTX209577.
Will a customer running an LTSR compliant environment be supported if they also have non- compliant components?
Citrix does not recommend mixing non-compliant components. For example, if a customer decides to implement Provisioning Services 7.7, which is not compliant with the current 7.6 LTSR environment and the customer has an issue with Provisioning Services 7.7 the customer may be asked to move to the latest Provisioning Services Current Release to receive public fixes
How often will Citrix release a Long Term Service Release of XenApp and XenDesktop or XenServer?
Citrix will release a Long Term Service Release of XenApp and XenDesktop or XenServer based on the number of features, implementations, customer support cases and general feedback. However, as very general guidance it can be expected that Citrix will release a new Long Term Service Release every 12-24 months; however, Citrix reserves the full rights to alter those timelines.
Is Citrix discontinuing the process of providing Hotfix Rollup Packs (HRP) for XenApp and XenDesktop?
With LTSR, Cumulative Updates will replace Hotfix Rollup Packs (HRP). Hotfix Rollup Packs (HRP) will still be made available for XenApp 6.5.
Will 7.6 LTSR support XenApp for Windows Server 2008 R2 for 10 years?
Windows Server 2008 R2 will not be eligible for extended support. Citrix will continue to monitor Windows 2008 R2 lifecycle dates for future determination of lifecycle milestones.
Pulls all information, static as well as dynamic from the central Site database
Has static as well dynamic(run-time) information cached locally
There is no direct communication between delivery controllers. No scheduled communication between the VDA’s and/or Site databases, only when needed.
Communicates with the IMA store, Peer Data Collectors and its session Hosts(within its own zone) on a scheduled interval, or when a Farm configuration change has been made.
Is responsible for brokering and maintaining new and existing user session only.
Often hosts user session, but can be configured as a dedicated data collector as well.
Can have a different operating system installed then the server and desktop VDA’s
Need to have the same operating system as all other session hosts and DC’s within same Farm.
Core services installed only. The HDX stack is part of VDA software
Has all the XenApp 6.5 or earlier bits and bytes fully installed.
Zones are optional. When configured they do need at least one Delivery controller present.
Each Zone has one Data Collector. Having multiple data collector means multiple zones.
Election does not apply. Deploy multiple, at least 2 Delivery controllers per site /zone (again one per zone is the minimum)
Can, and sometimes need to be elected. Configure at least one other Session Host per zone that can be elected as a Data Collector when needed.
When Central Site DB is down, no site wide configuration changes are possible. By default, Connection Leasing will kick in, enabling users to launch sessions which are assigned at least once during last 2 weeks prior to DB going offline.
when IMA Db is down, no Farm wide configuration changes are possible. Everything else continues to work as expected due to the LHC present on the Data Collectors and Session Hosts in each Zone.
A Delivery controller can have a direct connection(API) with a Hypervisor or cloud platform of choice.
Does not have any direct connection(API) with a Hypervisor or cloud platform management capabilities.
Almost all the communication directly flows through a Delivery Controller to Central Site DB.
Session Hosts as well as Data Collectors directly communicate with IMA database.
VDA’s needs to successfully register themselves with a Delivery controller.
When a XenApp server boots it needs a IMA service but it will not register itself anywhere.
Virtual Delivery Agent (VDA). There is a desktop OS VDA as well as a server OS VDA, including Linux.
Data Collector (one per zone).
Delivery Controller (multiple per Site).
Zones.
Zones (as of version7.7)
Local Host Cache (LHC).
Conenction Leasing
Delivery Services Console / App center.
Citrix Studio (including StoreFront) and Director.
EdgeSight monitoring (optional).
Partly built into Director
Application folders.
Application folders (new feature in 7.6) and Tags (all 7.x versions).
IMA Data store.
Central Site database (SQL only).
Load evaluators.
Load management policies.
IMA protocol and service.
Virtual Delivery Agents / TCP.
Farm Administrators.
Delegated Site Administration using roles and scopes, which are configurable as well.
Citrix Receiver.
Citrix X1 Receiver. It will provide one interface for both XenApp / XenDesktop as well as XenMobile.
Smart Auditor.
Session Recording.
Shadowing users.
Microsoft Remote Assistance, launched from Director.
USB 2.0.
USB 3.0. Support
Session Pre-launch and Session Lingering.
Session Pre-launch and Session Lingering. Both have been re-introduced.
Power and capacity management.
Basic power management from the GUI- advanced via powershell
Webinterface / StoreFront.
Webinterface / StoreFront.
Single Sign-on for all or most of applications
There is no separate Single Sign-On component available for XenApp 7.x. This is now configured using a combination of StoreFront, Receiver and policies.
Installed hotfixes inventory
Installed hotfixes inventory from studio
Support for Windows Server 2003 and 2008R2.
FMA 7.x supports Windows Server 2008 R2 ,Server 2012 R2,2016
Issues encountered post deployment of Netscaler 10.5
Requirement:
Customer imported NetScaler 10.5 VPX to Hyper-v and requested us to configure further configurations
Issue 1:Netscaler URL is not opening over internet
Observations & changes done:
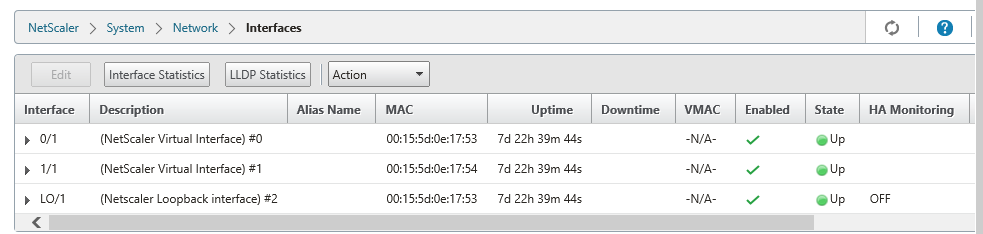
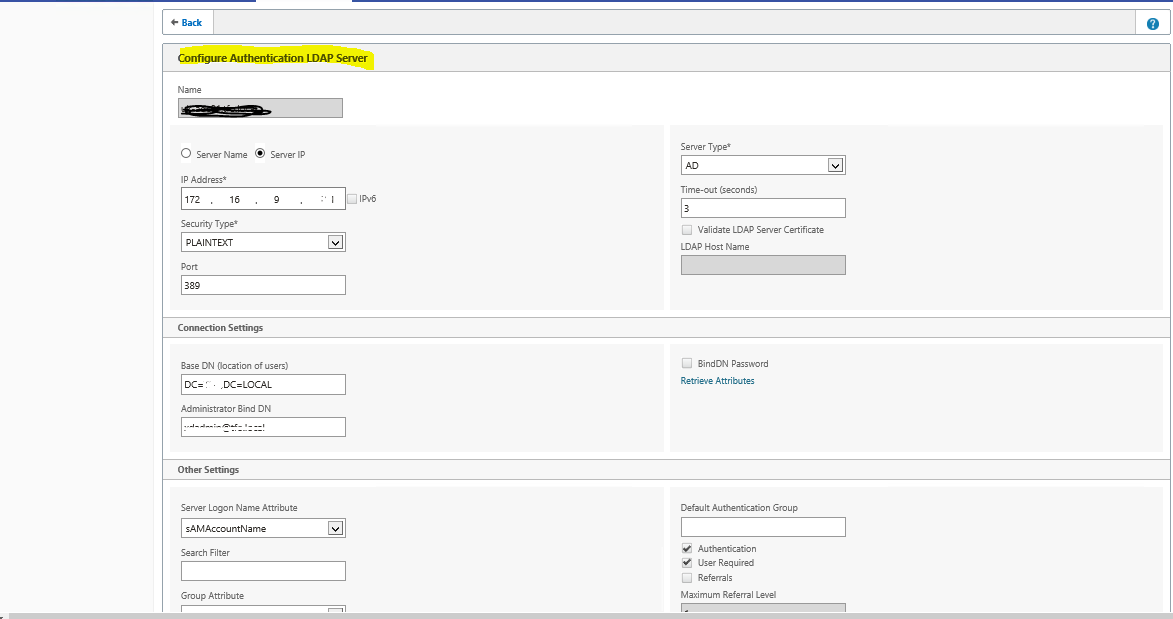
Netscaler has 3 Interfaces ( DMZ, LAN Zone & Loopback)
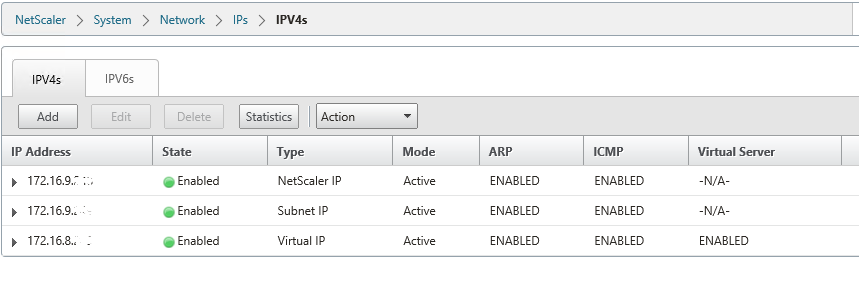
Netscaler IP’s as below
172.16.8.X is DMZ Virtual IP. It should be properly natted to public IP 192.X.X.X, then only Netscaler Access gateway web page will open over internet.
Network Team will do internal routes from 172.16.8.X to core switches so that it will reach to Citrix infra servers
Note that ,172.16.8.x is the virtual IP which you will configure in Gateway virtual server
Make sure that 80(STA Port),443(STA Port) ,1494 & 2598 ports opened bidirectional from Netscaler Virtual IP(172.16.8.X) to Citrix infrastructure servers
After above configurations, netscaler web page opening over internet but observed certificate errors and Authentication issue
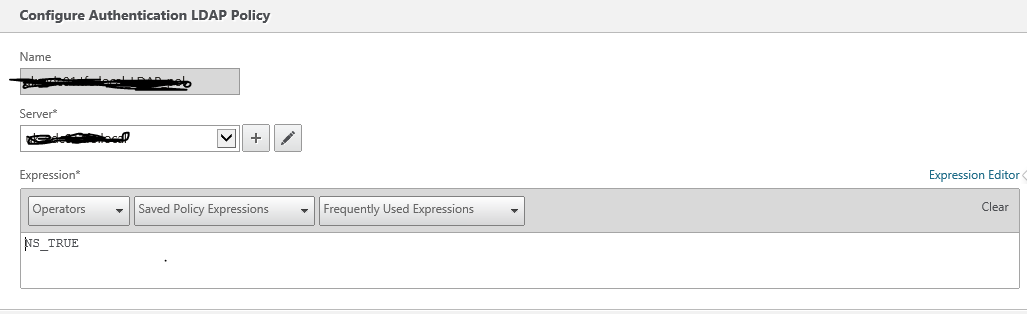
Issue 2:
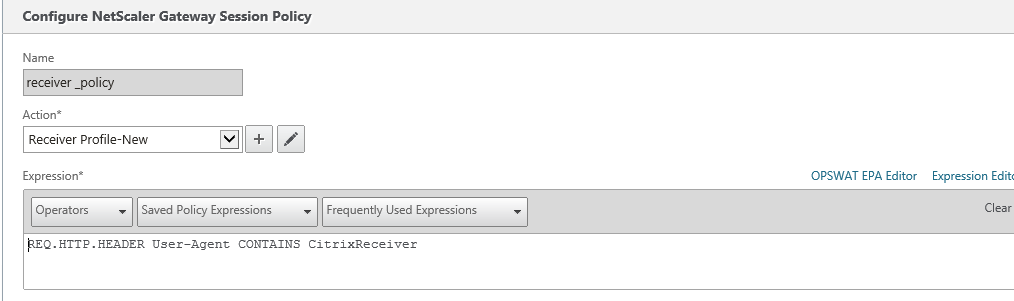
User getting error that the credentials are incorrect when logging to Netscaler
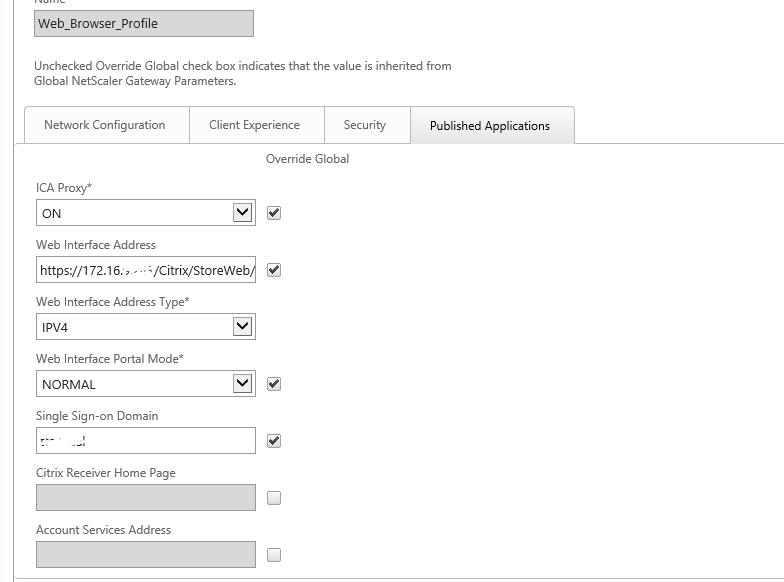
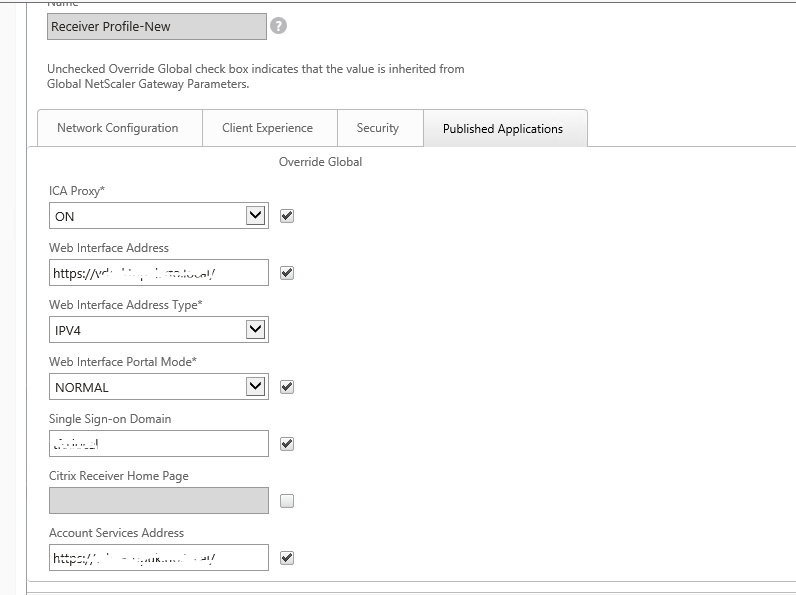
For Receiver, need to configure account services address (Similar to Xenapp Services URL)
Issue 5:
Error: Cannot complete request, before log into Netscaler webpage and issue is same from internal URL too.
Observations:
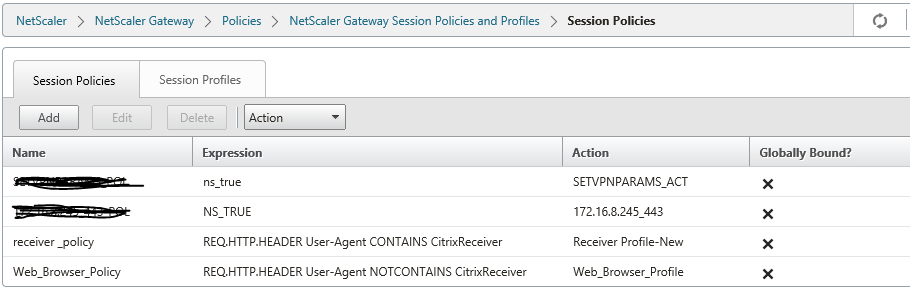
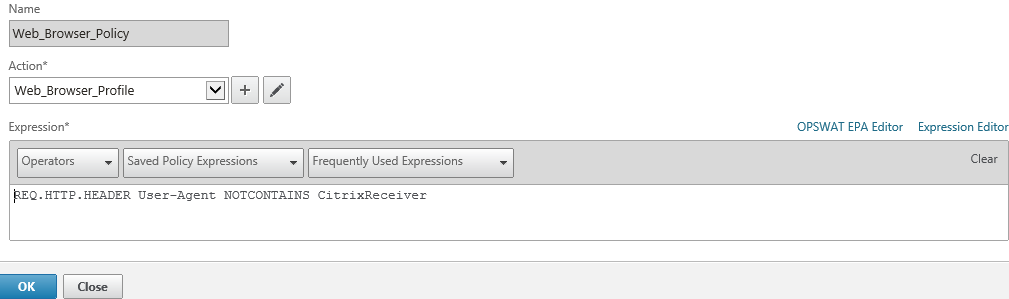
Load balancing Virtual name(VDIDesktopxx.locaL) is configured in Session profile but these load balancing VIP (SF1+Sf2) were hosted on separate load balancer and there was some issue with load balancing VIP
Customer removed Storefront load balancing IP configuration , informing us to point one storefront(SF1) only in Netscaler.
Post Load balancing configuration removal, we got the error “Cannot complete request” as netscaler is unable to find the load balance IP
Changes done:
Certificate was binded with local load balancing virtual name(VDIDesktopxx.locaL) hence to maintain the same , we created alias entry for SF1 server so that same URL will be accessed internally and the same reachable from netscaler
Observed XML was set to false in DDC, recommended to make it true so ran the command set-brokersite -TrustRequestsSentToTheXmlServicePort $true
After doing all above changes, Users are able to launch VDI externally and internally without any issues
Few months back, I had an issue with one of the xen server, we had 2 servers (Server1 & Server2) in a pool. server1 is down and unable to bring it up due to hardware issue.
Troubleshooting’s:
Not able to connect SERVER2 with Xen center
Login to -> Putty to SERVER2 , issued the command to su – To change shell to super user mode
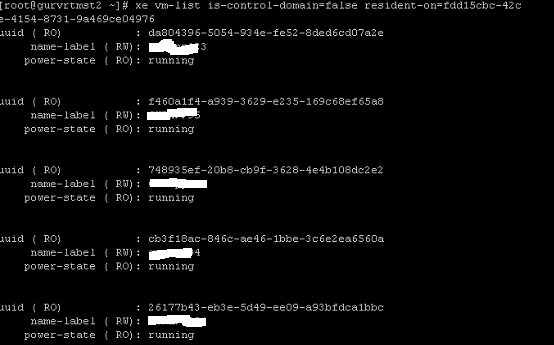
Issue the command xe vm-list & xe host-list -> Check server is displaying VM’s or host , if not execute below commands
Issue the command xe-tool-stack-restart -> To display the VM’s & host, by issuing this command VM’s & server will not have any impact
After issuing above command , all xen server commands are working and able to see host & VM list
Currently SERVER2 is a slave , issue the below command to force SERVER2 as a master
xe pool-emergency-transition-to-master
Now the SERVER2 is a master, issue the below command to know the which xen servers are false or live and to know UID’s